
1.6 TDI CR engine (EA189) · Removing and installing engine · Removing and installing engine
Installing engine
⇒ 1.4.1 Notes on installing, Polo
1.4.1 Notes on installing, Polo
Installation is performed in the reverse sequence. During this procedure, observe the following:
Repairing clutch: ⇒ Rep. gr. 30; Clutch mechanism; Fitting location overview - clutch mechanism
- Check whether dowel sleeves for centring engine/gearbox have been fitted in cylinder block, insert if necessary.
- When installing »engine/gearbox assembly«, ensure sufficient clearance to subframe and radiator.
Polo
Torque settings: ⇒ 2.1.2 Assembly overview – assembly mountings, Polo
Electrical connections and routing ⇒ Electrical system; Rep. gr. 00; Repair instructions; Routing and securing wires.
Vehicles with manual gearbox:
- Install clutch slave cylinder ⇒ Rep. gr. 30; Clutch mechanism; Removing and installing clutch slave cylinder.
- Install gearbox selector mechanism and adjust if necessary ⇒ Rep. gr. 34; Manual gearbox; Removing and installing manual gearbox.
Vehicles with dual clutch gearbox:
- Install selector lever cable and adjust if necessary ⇒ Rep. gr. 34; Selector mechanism; Removing and installing selector mechanism.
Continued for all vehicles
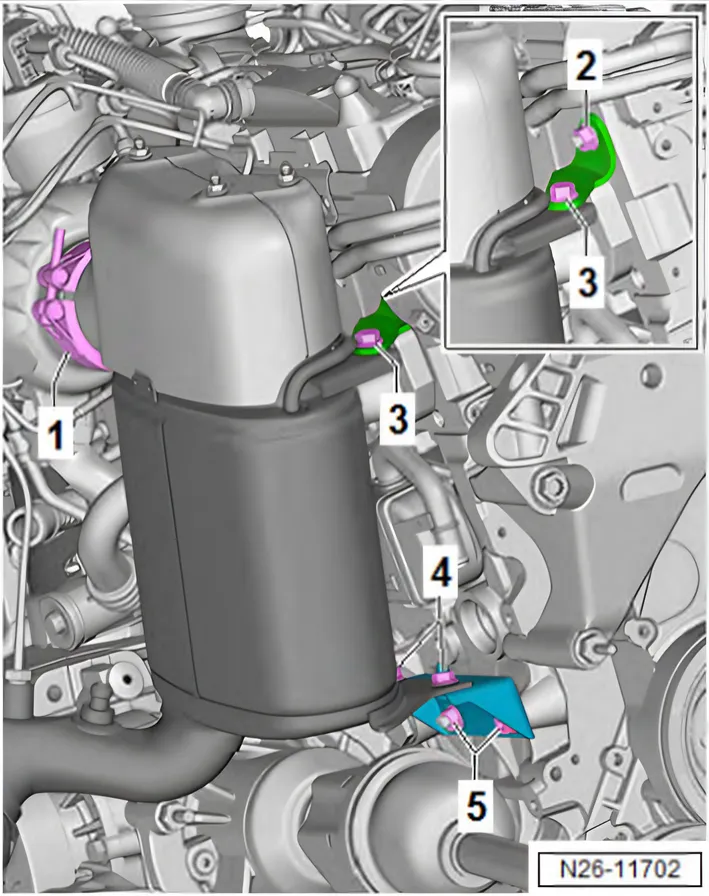
Observe sequence when installing particulate filter:
| 1) | Position particulate filter on turbo charger and loosely attach clip -1- |
|---|---|
| 2) | Screw bolts and nuts -2…5- in by hand • It must still be possible to move particulate filter and bracket |
| 3) | Tighten clip -1- |
| 4) | Tighten nuts and bolts -2- and -5- |
| 5) | Tighten nuts and bolts -3- and -4- |
Polo: specified torques - particulate filter ⇒ 2.1.3 Assembly overview - front exhaust pipe with particulate filter, Polo, left-hand drive
- Bolt drive shafts to gearbox ⇒ Running gear, axles, steering; Rep. gr. 40; Drive shaft; Removing and installing drive shaft.
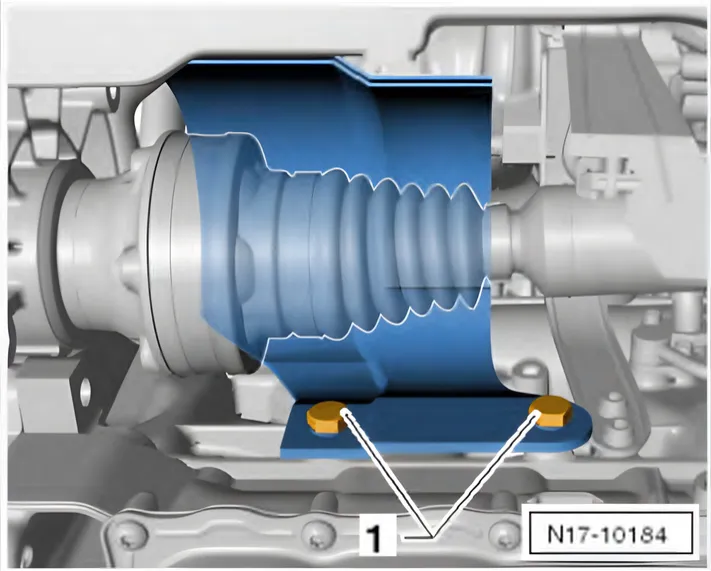
- Install heat shield for drive shaft (right side) -1-.
Specified torque for bolts for drive shaft heat shield -1- ⇒ Running gear, axles, steering; Rep. gr. 40; Drive shaft; Removing and installing drive shaft heat shield.
- Install lock carrier ⇒ General body repairs, exterior; Rep. gr. 50; Lock carrier; Removing and installing lock carrier.
- Secure refrigerant lines to air conditioner compressor and condenser such that they are stress-free ⇒ Heating, air conditioning; Rep. gr. 87; Refrigerant circuit; Disconnecting and connecting refrigerant lines from and to condenser.
- Fill air conditioning system ⇒ Air conditioning systems with refrigerant R134a; Rep. gr. 00; Working with air conditioner service station; Filling refrigerant circuit using air conditioner service station.
- Install battery and battery tray ⇒ Electrical system; Rep. gr. 27; Battery; Removing and installing battery.
- Observe notes after connecting battery ⇒ Electrical system; Rep. gr. 27; Battery; Disconnecting and reconnecting battery.
- Add coolant ⇒ 1.3.2 Filling with coolant.
- Filling fuel system ⇒ 1.3 Filling/bleeding fuel system.
- Read event memories of all control units.
- Clear all entries which may have occurred during installation ⇒ Vehicle diagnostic tester.
- Check headlight adjustment and correct if necessary ⇒ Maintenance; Booklet 20.1.
Specified torques
| Bolted connection | Specified torque |
|---|---|
| Nuts and bolts M6 M7 M8 M10 M12 | 10 Nm |
| 15 Nm | |
| 20 Nm | |
| 40 Nm | |
| 65 Nm1) |
1) Specified torque for M 12 flange bolts: 75 Nm
1.4.3 Installing engine
Specified torques
| Component | Nm |
|---|---|
| Bolts and nuts M6 M7 M8 M10 M12 | 10 |
| 15 | |
| 20 | |
| 40 | |
| 65 | |
| Except for the following: | |
| Drive shaft heat shield to cylinder block | 35 |
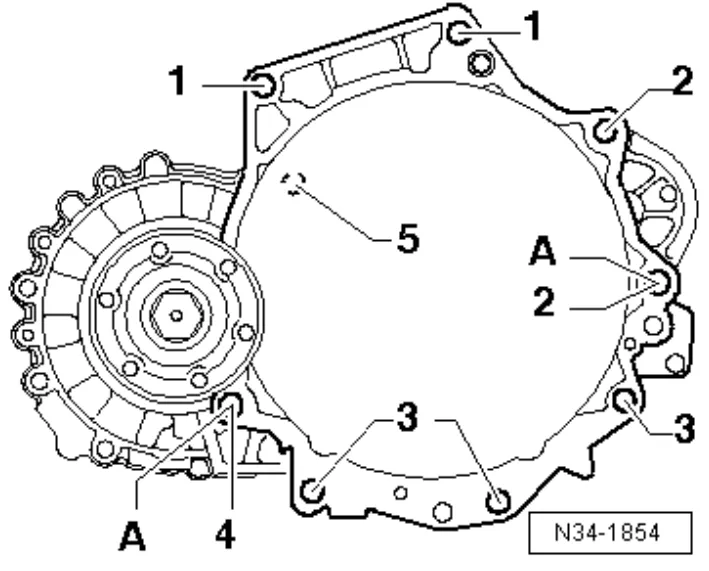
Gearbox to engine attachments
| Item | Bolt | Nm |
|---|---|---|
| 1 | M12 x 55 | 80 |
| 21) | M12 x 150 | 80 |
| 3 | M10 x 50 | 40 |
| 4 | M12 x 60 | 80 |
| 52) | M6 x 8 | 10 |
| A | Dowel sleeves for centring | |
| • 1) Also secures starter | ||
| • 2) Cover plate for flywheel | ||
Installation is carried out in the reverse order. When installing, note the following:
- Engine/gearbox assembly mounted on engine bracket - T10012-.
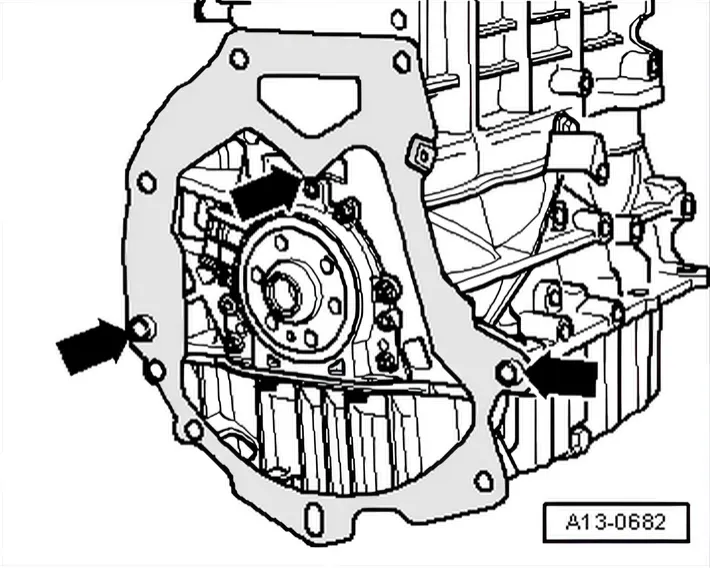
- Check that intermediate plate is hooked into sealing flange and pushed onto dowel sleeves -arrows-.
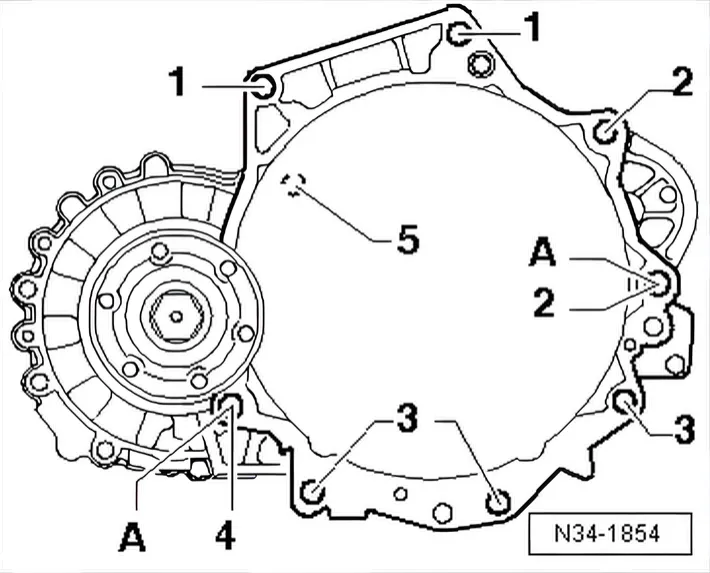
- If there are no dowel sleeves -A- in the cylinder block for centring the engine and gearbox, insert new dowel sleeves.
- If clutch release bearing is worn, renew it ⇒ Rep. gr. 30; Clutch mechanism; Repairing clutch release mechanism.
- Lightly grease gearbox input shaft splines with grease for clutch plate splines ⇒ Electronic parts catalogue (ETKA).
- Check centring of clutch plate.
- Tighten gearbox to engine.
- Guide engine/gearbox assembly into body.
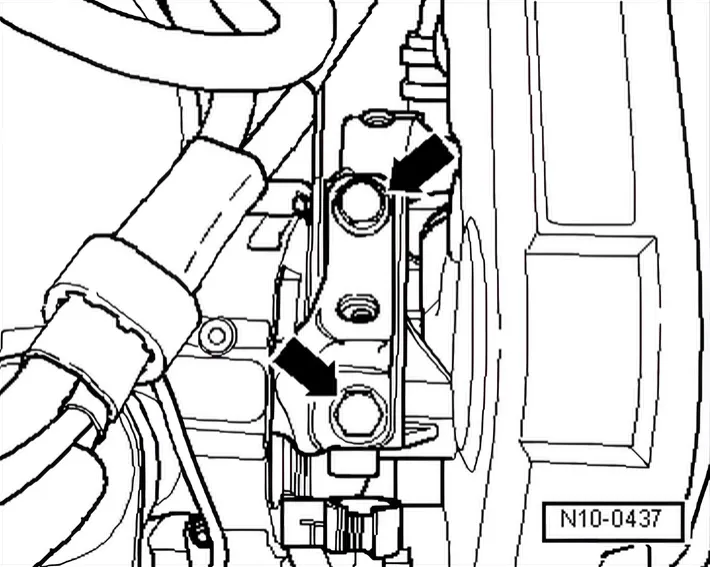
- First screw bolts -arrows- for engine mountings into stop by hand.
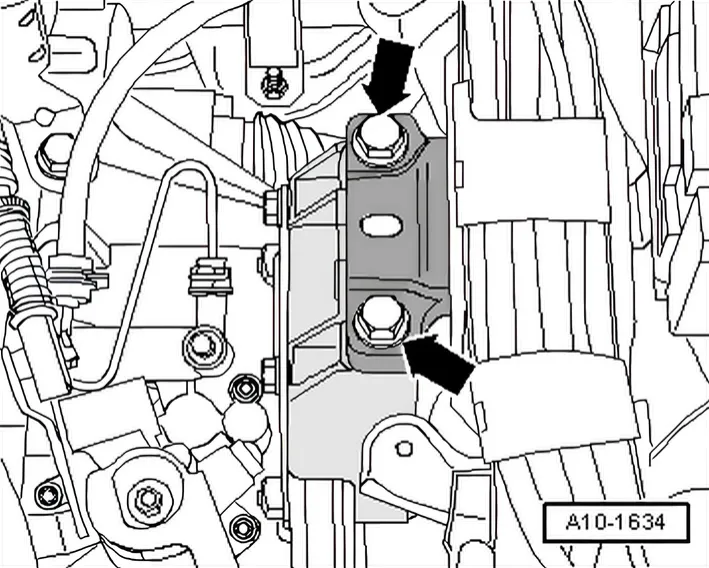
- First screw bolts -arrows- for gearbox mountings into stop by hand.
- Remove engine bracket - T10012- from engine.
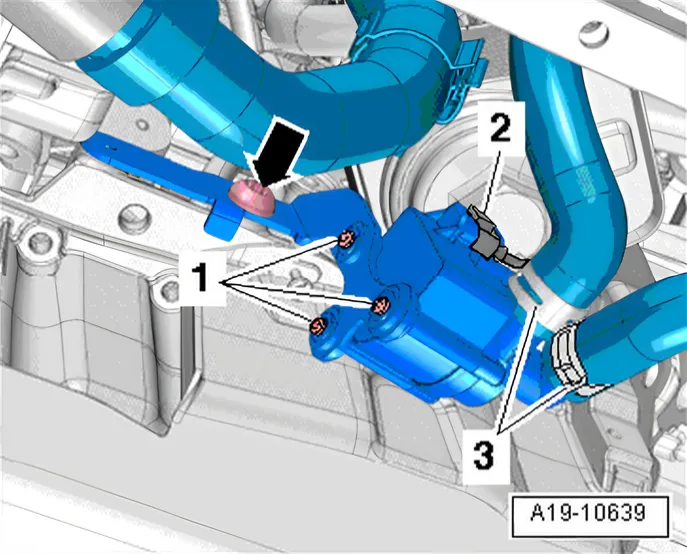
- Installing continued coolant circulation pump.
- Installing charge air pipe ⇒ 2.1 Assembly overview - charge air system.
- Install intake union.
- Installing intake hoses with screw-type clips ⇒ 2.3 Assembly overview - charge-air hose connections.
- Install particulate filter ⇒ 2.2 Removing and installing particulate filter.
- Install drive shafts, transverse link and coupling rod ⇒ Running gear, axles, steering; Rep. gr. 40.
- Install air conditioner compressor ⇒ Heating, air conditioning; Rep. gr. 87; Air conditioner compressor; Removing and installing air conditioner compressor.
- Install poly V-belt ⇒ 1.2 Removing and installing poly-V belt.
- Install starter ⇒ Electrical system; Rep. gr. 27; Starter; Removing and installing starter.
- Install wheel housing liner front parts ⇒ General body repairs, exterior; Rep. gr. 66; Wheel housing liner; Removing and installing wheel housing liner.
- Installing radiator ⇒ 4.2 Removing and installing radiator.
- Connect coolant hoses with plug-in connector to heat exchanger for heater.
- Install pressure differential sender - G 505- ⇒ 5.6 Removing and installing pressure differential sender - G505-.
- Install washer fluid reservoir filler pipe with filler neck.
- Install clutch slave cylinder ⇒ Rep. gr. 30; Clutch mechanism; Removing and installing clutch slave cylinder.
- Install cable with cable support bracket ⇒ Rep. gr. 34; Selector mechanism; Assembly overview - selector mechanism.
- Install pendulum support ⇒ 2 Assembly mountings.
- Electrical connections and routing ⇒ Electrical system; Rep. gr. 00; Repair instructions; Routing and securing wires.
- Install battery mounting and battery ⇒ Electrical system; Rep. gr. 27; Battery; Removing and installing battery.
- Install and adjust windscreen wiper arms ⇒ Electrical system; Rep. gr. 92; Windscreen wiper system; Removing and installing windscreen wiper arms.
- Install air filter housing ⇒ 7.2 Removing and installing air filter housing.
- Check oil level ⇒ 1.5.2 Checking engine oil level.
- Add coolant ⇒ 1.3.2 Filling with coolant.
- Install noise insulation:
Polo ⇒ General body repairs, exterior; Rep. gr. 50; Noise insulation; Assembly overview - noise insulation
Tightening torques on this page
2 torques
1.4.1 Notes on installing, PoloTo the table ↑
| Part | Torque |
|---|---|
| Nuts and bolts M6 M7 M8 M10 M12 | 10 Nm |
1.4.1 Notes on installing, PoloTo the steps ↑
| Step | Torque |
|---|---|
| 1) Specified torque for M 12 flange bolts: 75 Nm | 75 Nm |