
Running gear, axles, steering · Steering · Steering column
Removing and installing steering column
Special tools and workshop equipment required
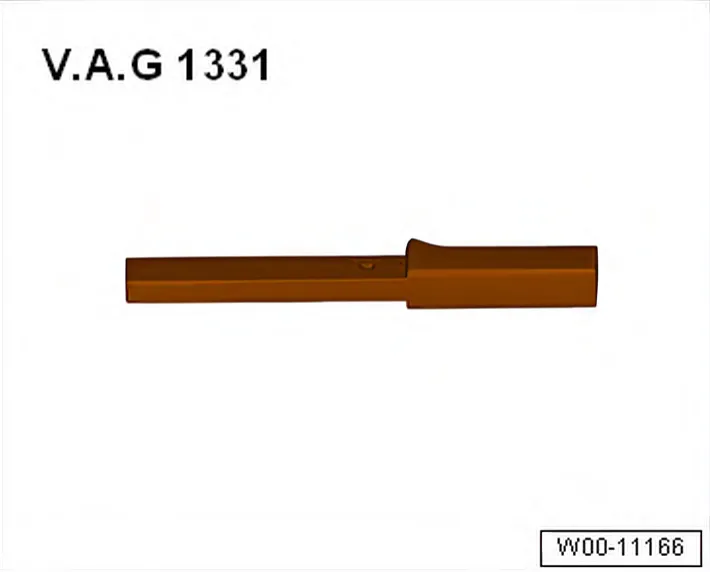
- Torque wrench - V.A.G 1331-
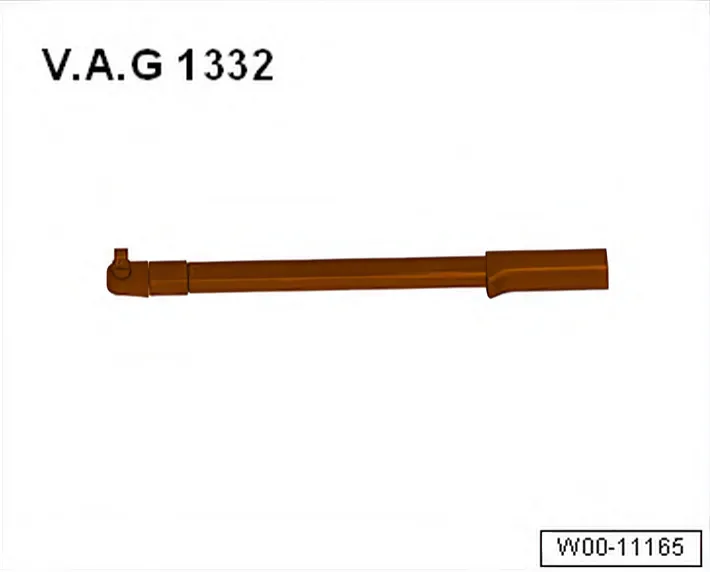
- Torque wrench - V.A.G 1332-
Removing
6R 2009–2014 Only the complete steering column is supplied as a replacement part. Repair is not possible.
Steering lock housing can be converted ⇒ Electrical system; Rep. gr. 94; Ignition lock housing.
Failure to comply with these precautions may lead to subsequent failure of the airbag system!
6R 2009–2014 Removal and installation of the coil connector with slip ring must be carried out with the wheels in the straight-ahead position.
Coil connector with slip ring is secured as a new part in the centre position with a cable tie.
Vehicles with ESP
Vehicles with ESP are additionally equipped with a steering angle sensor - G85-. It is fitted in a housing together with the slip ring and coil connector.
After installation work on steering column switch, basic settings for steering angle sender - G85- must be carried out.
- Turn wheels to straight-ahead position.
- Pull down lever on side of steering column.
- Swing steering column down as far as possible and pull out.
- Press lever on side of steering column back up.
- 6R 2009–2014 Remove steering column switch ⇒ Electrical system; Rep. gr. 94; Steering column switch; Removing and installing steering column switch.
- Remove lower steering column trim ⇒ General body repairs, interior; Rep. gr. 68; Compartments/covers; Removing and installing lower steering column trim.
6C 2014–2017
- Remove upper steering column trim ⇒ General body repairs, interior; Rep. gr. 68; Compartments/covers; Removing and installing upper steering column trim.
- Remove driver side airbag unit ⇒ General body repairs, interior; Rep. gr. 69; Driver side airbag; Removing and installing airbag unit with igniter.
- Remove steering wheel ⇒ 1.2 Removing and installing steering wheel.
- Remove steering column combination switch - E595- ⇒ Electrical system; Rep. gr. 94; Steering column switch module; Removing and installing steering column combination switch.
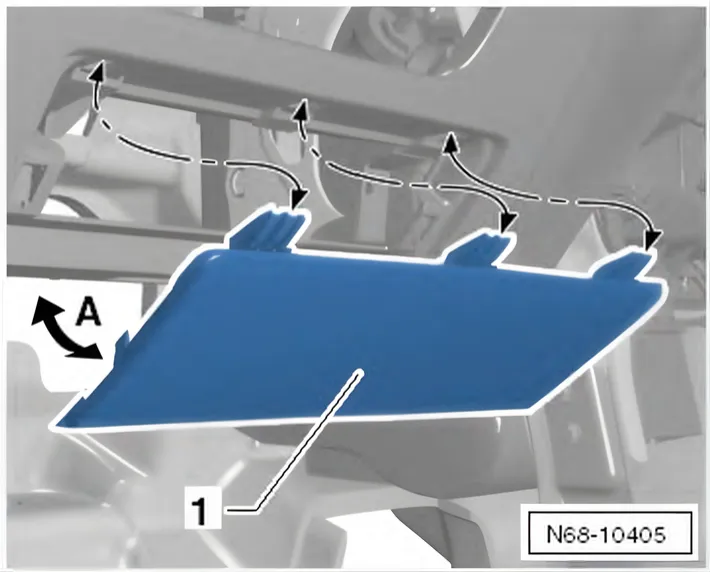
- Pull cover -1- out of catches in lower area -arrow A-, and remove it from dash panel.

- Mask dash panel -1- in area of steering column using e.g. textile adhesive tape -2- to prevent damage to dash panel.
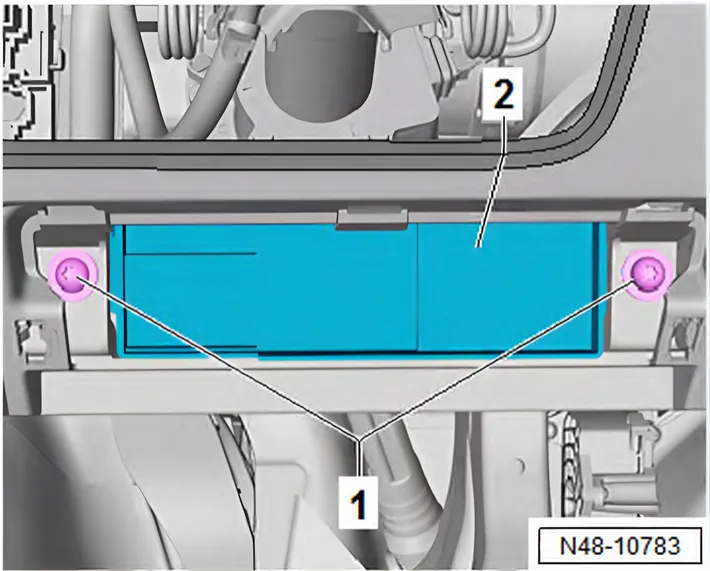
- Unscrew bolts -1-, move fuse holder -2- under dash panel to side, and secure it in position.
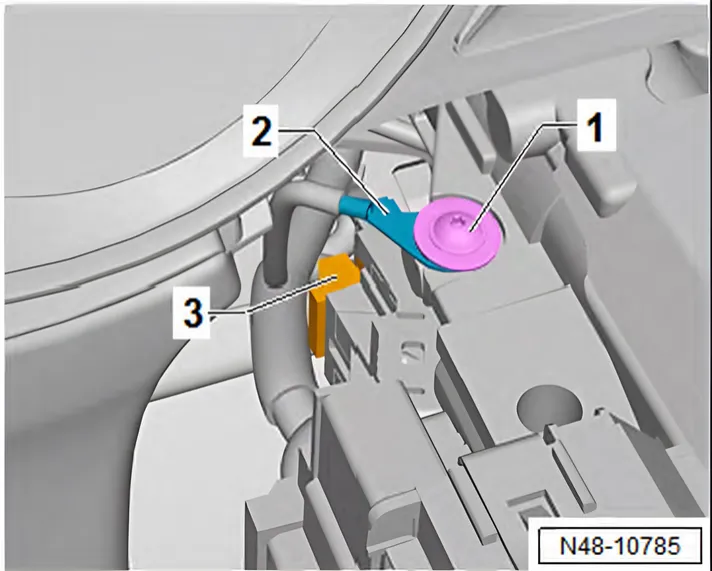
- Unscrew bolt -1-.
- Detach earth wire -2-.
- Disconnect connector -3- from steering lock.
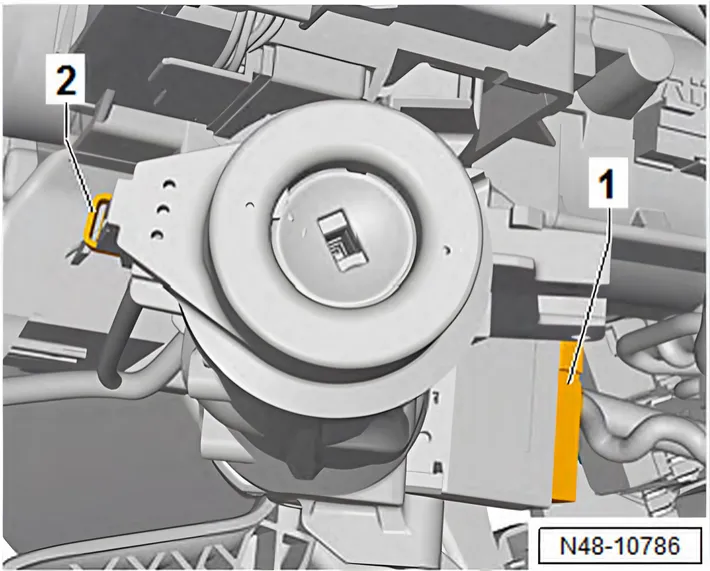
- Disconnect connector -1-.
- Unplug connector -2- from immobiliser reader coil - D2-.
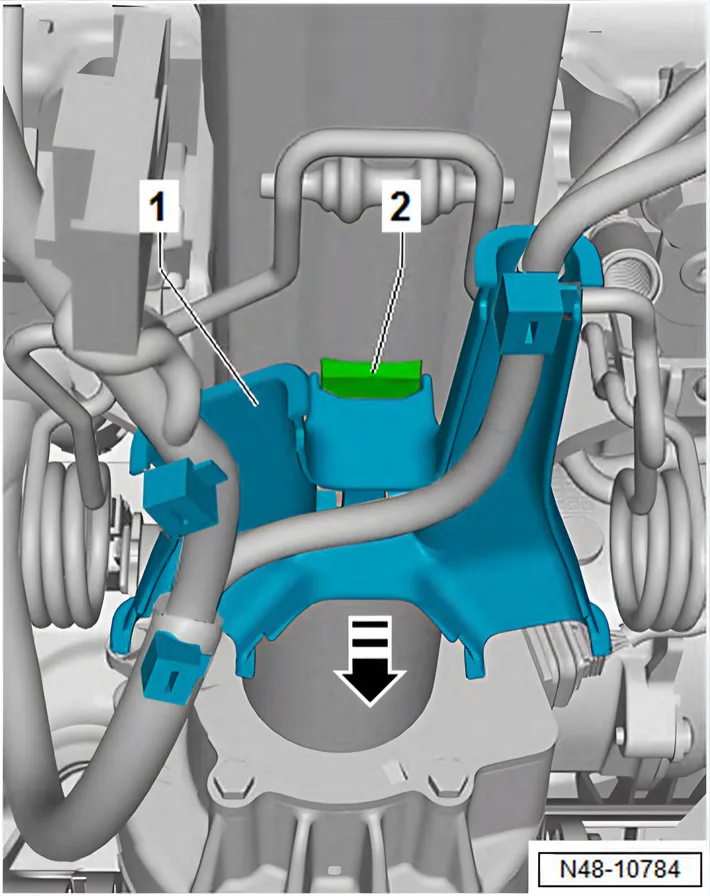
- Push retainer for wiring harness -1- downwards in direction of -arrow- off steering column lug -2-.
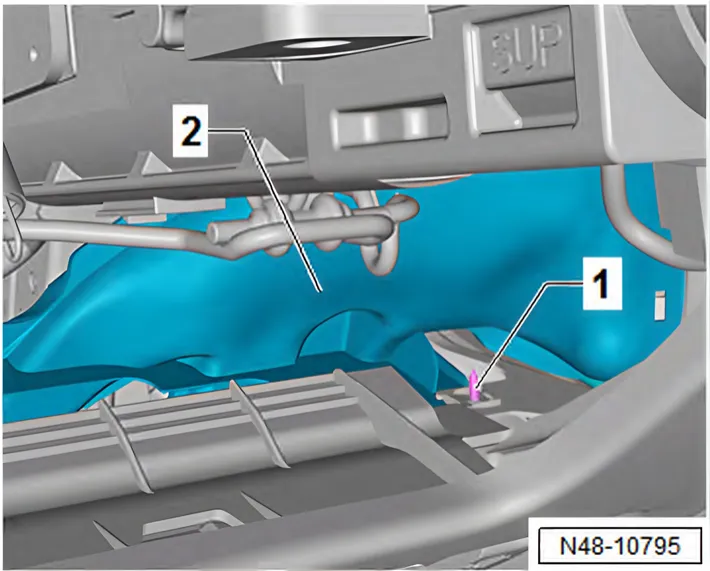
- Unscrew bolt -1-.
- Remove driver side footwell vent -2-.
LHD only
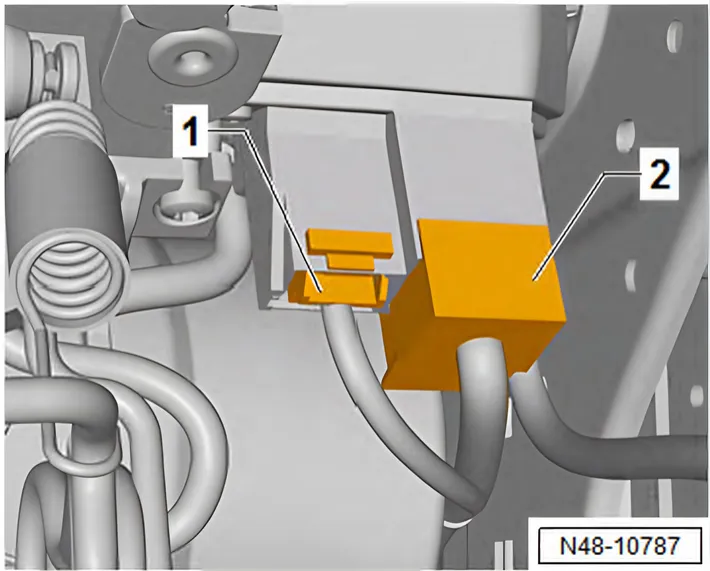
- Disconnect connectors -1- and -2- from steering column electronics control unit - J500-.
RHD only
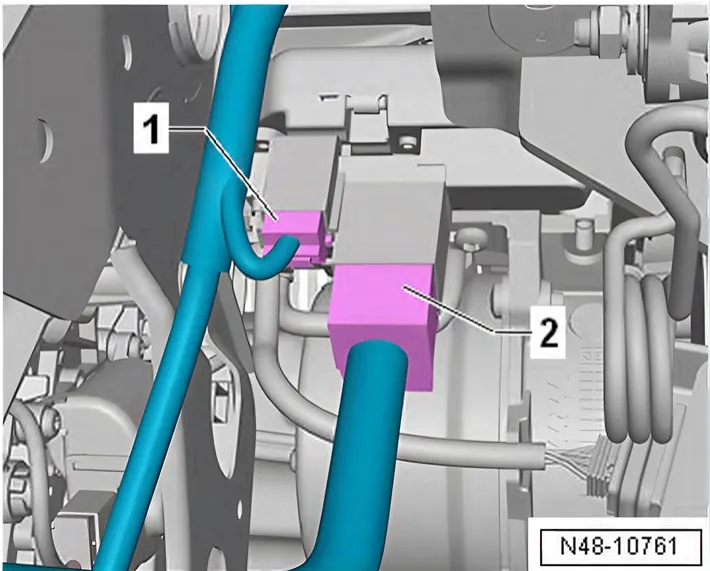
- Disconnect connectors -1- and -2- from steering column electronics control unit - J500-.
Continued for all vehicles
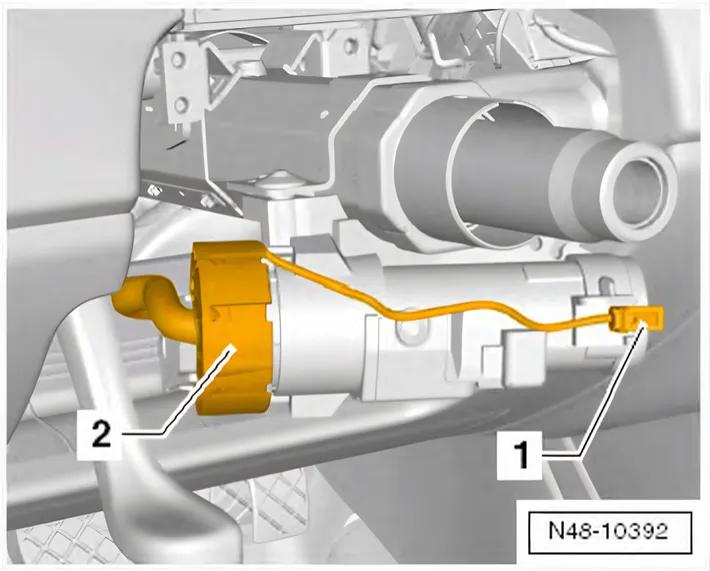
- Unplug connector -1- from immobiliser reader coil - D2-.
On vehicles with an automatic gearbox, the ignition key removal lock cable must be also be unhooked ⇒ Rep. gr. 37.
- Pull connector -2- off steering lock housing.
- Unbolt earth cable for steering column.
- Remove earth cable and steering column switch line from cable retainer.
- Fold floor covering back slightly.
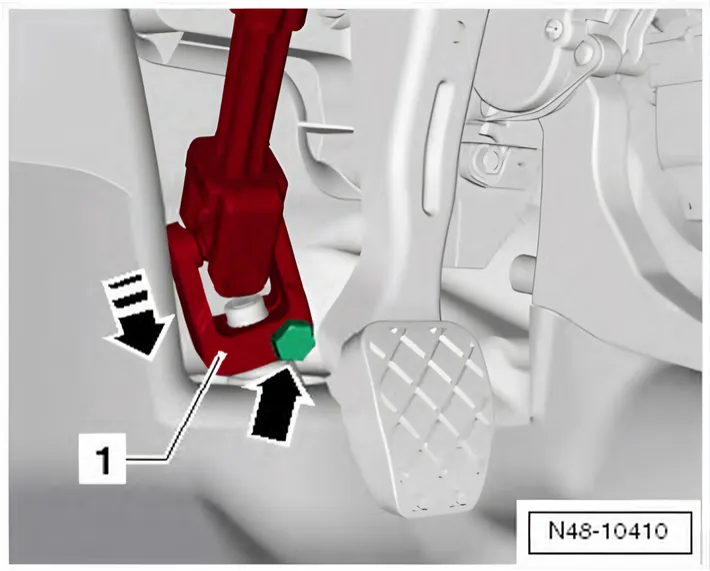
- Unscrew bolt -arrow- from universal joint -1- and pull off universal joint in -direction of arrow-.
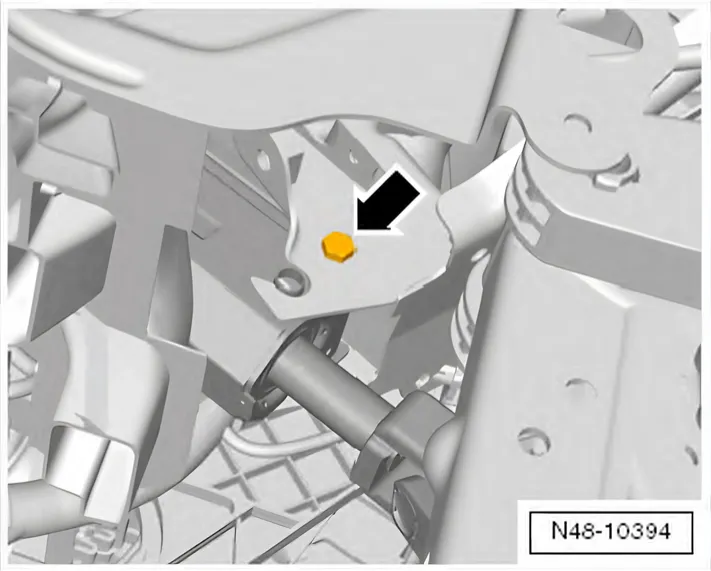
- Unscrew securing bolt -arrow- on left of brake pedal from mounting bracket.
- Lower steering column -1- slightly and carefully pull out of guide -arrow- on mounting bracket -2-.
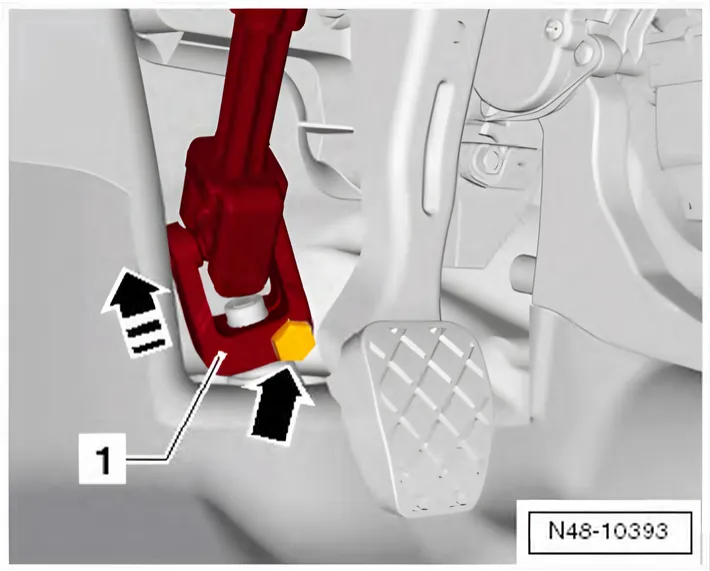

- Unscrew bolt -1-.
- Pull steering column articulated shaft -2- in -direction of arrow- off steering column and lay to side.
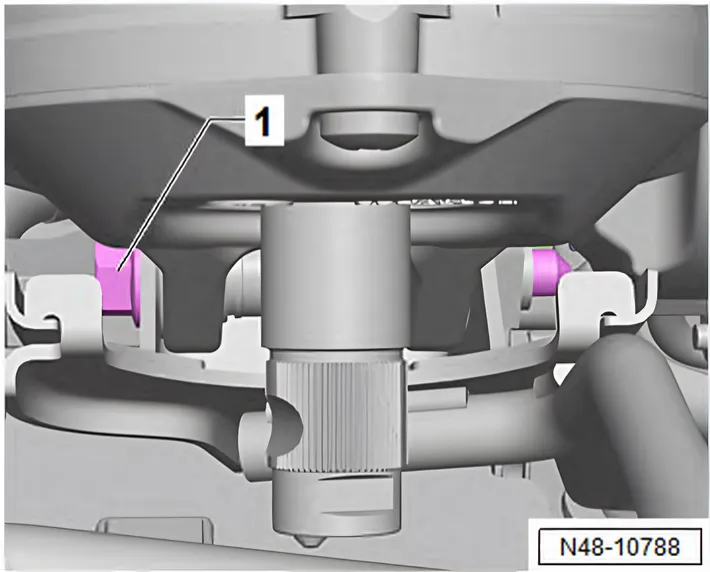
- Unscrew bolt -1-.
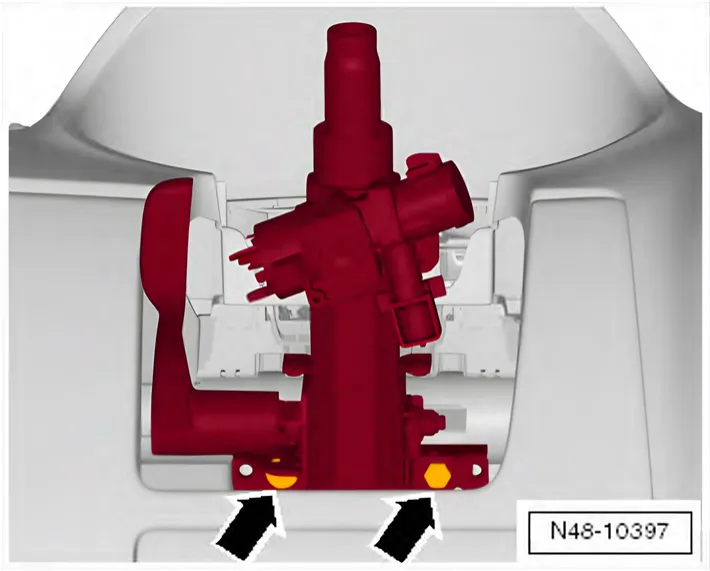
- 6R 2009–2014 Unscrew bolts -arrows- from steering column and hold steering column.
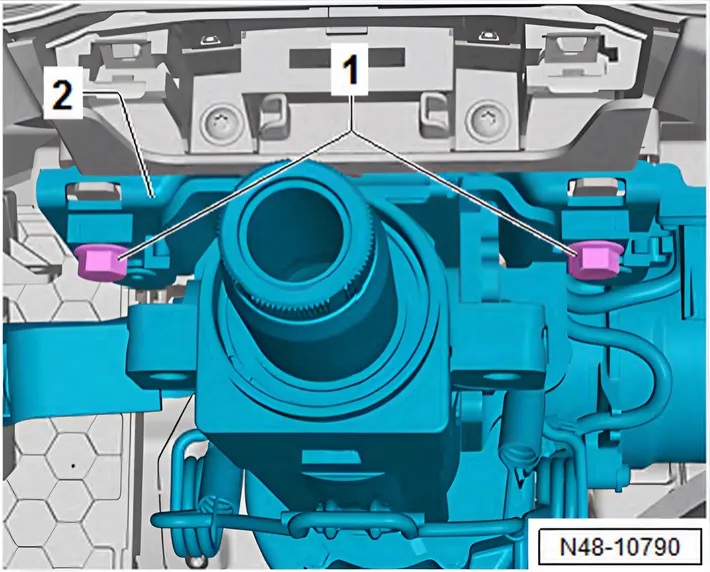
- 6C 2014–2017 Unscrew bolts -1- from steering column -2-.
6C 2014–2017
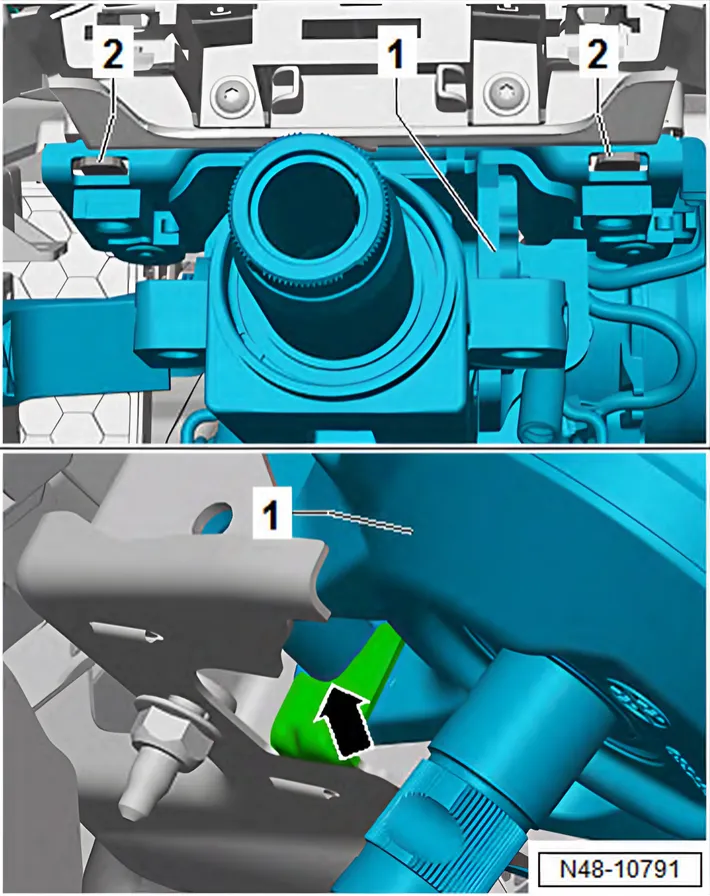
- Pull steering column -1- towards the rear off lugs -2- on cross member.
- Lower steering column slightly, and pull it towards the rear off tab -arrow-.

- Pull steering column -1- towards the rear while at the same time turning it so that power steering control unit - J500- -2- rests against dash panel.
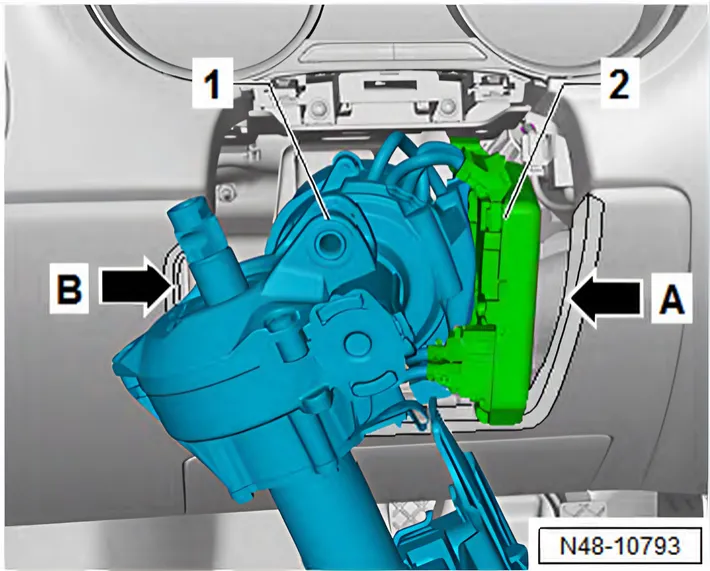
- Turn steering column -1- downwards and past dash panel aperture -arrow B-.
- Turn power steering control unit - J500- -2- past dash panel aperture -arrow A-.
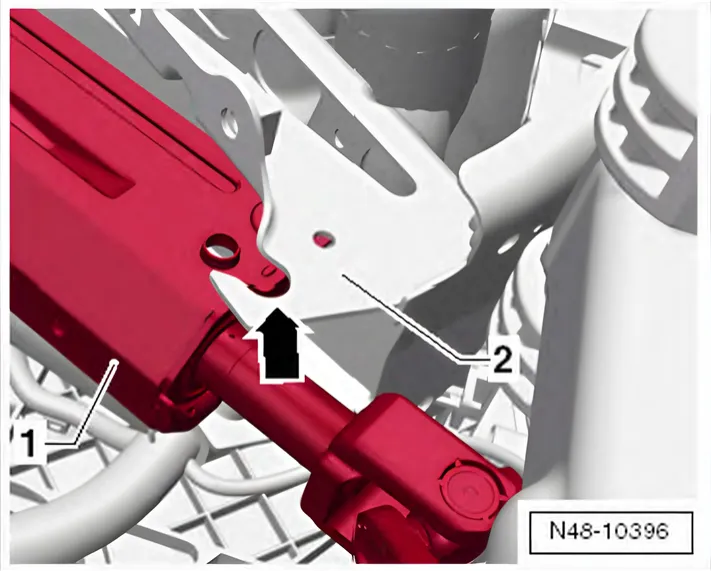
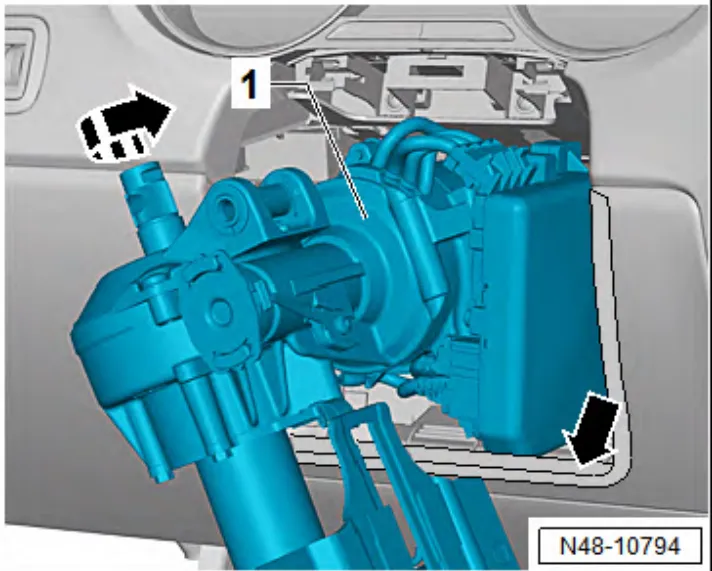
- Turn steering column -1- in direction of -arrow- around its own axis until it can be removed.
Installing
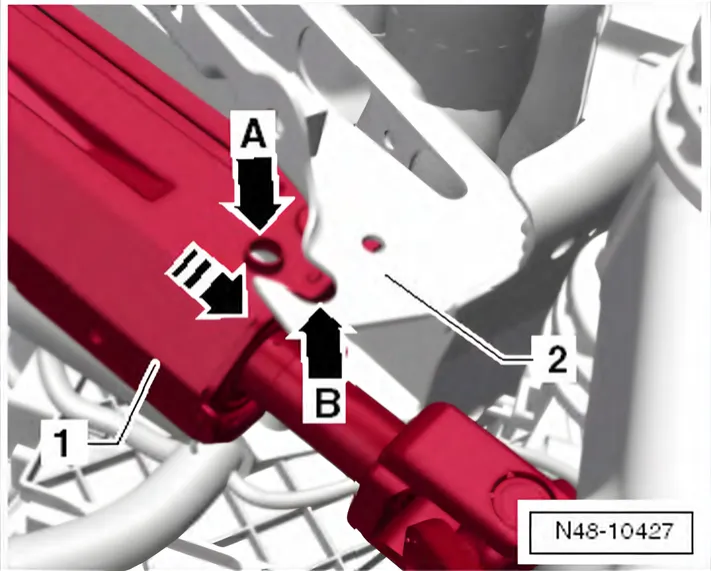
- Insert steering column -1- with raised areas -arrow A- into guides -arrow B- on mounting bracket -2-.
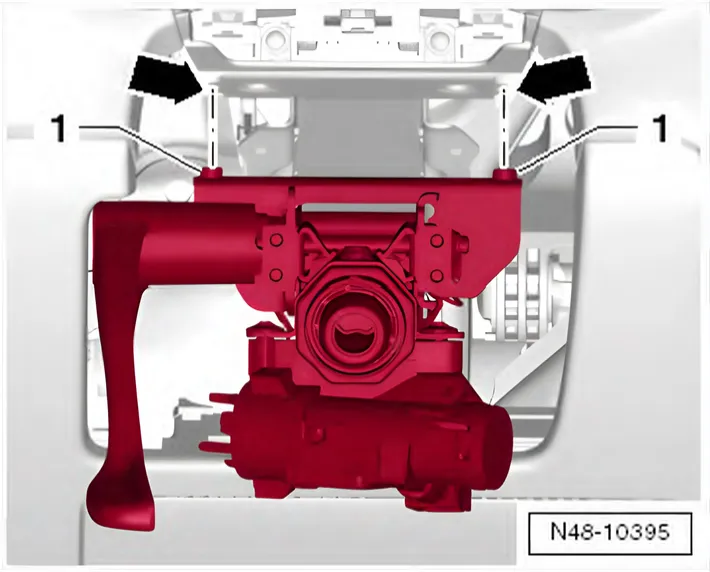
- Swivel steering column up, align with mounting bracket and position.
Holes -arrows- and journals -1- must align.
The correct installation position of the steering column relative to the mounting bracket is guaranteed only in this way.
6C 2014–2017
If the lever has nevertheless been released, perform installation with the lever in released position. Otherwise, the locking mechanism of the steering column will become damaged.
6R 2009–2014
- Tighten steering column bolts -arrows-.
- Release lever on side of steering column.
- Screw in lower securing bolt -arrow- and tighten.
- Position universal joint -1- onto steering pinion.
- Insert new hexagon bolt -arrow- and tighten.
- Fit electrical connector -1- on steering lock housing.
- Fit connector -2- of immobiliser reader coil - D2-.
- Insert earth cable and steering column switch line into cable retainer.
- Tighten earth cable for steering column.
- Insert cable in cable retainer and close at tabs.
On vehicles with an automatic gearbox, the ignition key removal lock cable must be hooked in ⇒ Rep. gr. 37.
- Install steering column switch ⇒ Electrical system; Rep. gr. 94; Steering column switch; Removing and installing steering column switch.
Vehicles with ESP
- Install steering angle sender - G85- ⇒ Electrical system; Rep. gr. 94; Steering column switch; Removing and installing steering column switch.
6C 2014–2017 Drawing as above ⇑
- Turn steering column -1- in opposite direction of -arrowaround its own axis until it can be inserted in dash panel aperture -arrow-.
- Turn and raise steering column until it can be attached to cross member.
- Insert steering column -1- into tab -arrow-.
- Fit steering column -1- onto lugs -2- on cross member.
- Screw in bolt -1-, and tighten it to specified torque.
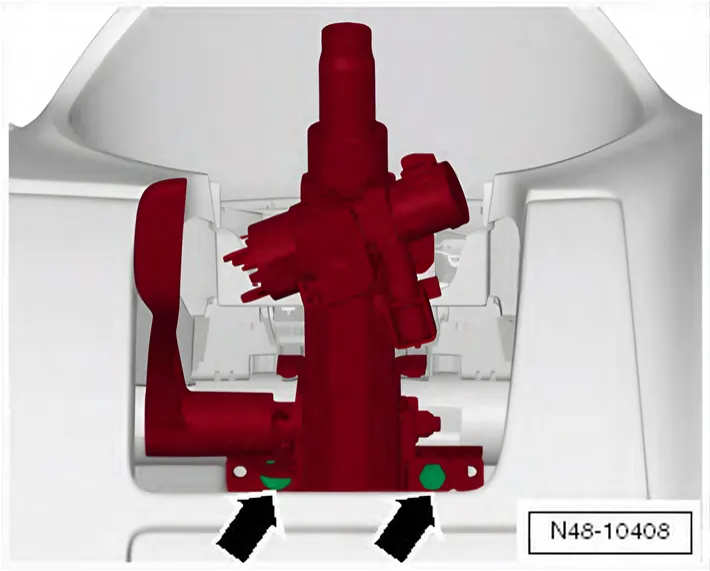
6C 2014–2017 Drawing as above ⇑
- Screw in bolts -1- of steering column -2-, and tighten them to specified torque.
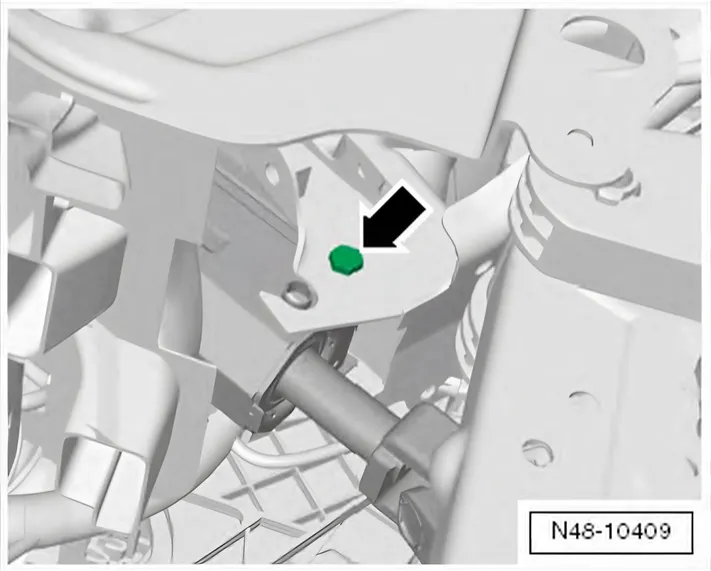
6C 2014–2017 Drawing as above ⇑
- Fit steering column articulated shaft -2- to steering column in opposite -direction of arrow- and tighten new bolt -1- to specified torque.
LHD only
6C 2014–2017 Drawing as above ⇑
- Connect connectors -1- and -2- to steering column electronics control unit - J500-.
RHD only

6C 2014–2017 Drawing as above ⇑
- Connect connectors -1- and -2- from steering column electronics control unit - J500-.
Continued for all vehicles
6C 2014–2017 Drawing as above ⇑
- Insert driver side footwell vent -2-.
- Insert bolt -1- and tighten.
- Connect connector -2- to immobiliser reader coil - D2-.
- Connect connector -1-.
- Connect connector -3- to steering lock.
- Secure earth wire to steering column -2- by means of bolt -1-.
- Push bracket -1- in opposite direction of -arrow- into guide on steering column -2-.
- Insert fuse holder -2-.
- Screw in and tighten bolts -1-.
- Install cover -1- in lower area of dash panel.
- Remove textile adhesive tape -2- from dash panel -1-.
- Install steering column combination switch - E595- ⇒ Electrical system; Rep. gr. 94; Steering column switch module; Removing and installing steering column combination switch.
- Install steering wheel ⇒ 1.2 Removing and installing steering wheel.
- Install airbag unit ⇒ General body repairs, interior; Rep. gr. 69; Driver side airbag; Removing and installing airbag unit with igniter.
- Install upper steering column trim ⇒ General body repairs, interior; Rep. gr. 68; Compartments/covers; Removing and installing upper steering column trim.
- Install lower steering column trim ⇒ General body repairs, interior; Rep. gr. 68; Compartments/covers; Removing and installing lower steering column trim.
6R 2009–2014 Vehicles with ESP
- Perform basic setting of steering angle sender - G85- using vehicle diagnostic tester ⇒ Vehicle diagnostic tester.
6C 2014–2017
- Connect earth strap to battery ⇒ Electrical system; Rep. gr. 27; Battery; Disconnecting and connecting battery.
- Steering mechanism needs to be re-adapted every time after the steering column has been renewed or reinstalled after removal ⇒ Vehicle diagnostic tester.
Specified torques
| Component | Specified torque |
|---|---|
| Steering column to upper mounting bracket | 20 Nm |
| 6R 2009–2014 Steering column to lower mounting bracket | 8 Nm |
| 6R 2009–2014 Steering column to steering rack ♦ Use new bolt | 30 Nm |
| 6C 2014–2017 Steering column to steering rack ♦ Use new bolt | 20 Nm +180° |
Different bolts: the Polo 6R manual tightens the intermediate steering shaft to the steering rack to 30 Nm, the Polo 6C manual to 20 Nm +180° (assembly overview, steering column).
6C 2014–2017
- ⇒ 2.1 Assembly overview - steering column
- Footwell vent below steering column ⇒ Heating, air conditioning system; Rep. gr. 87; Air duct; Assembly overview - air duct and air distribution in passenger compartment.
- Steering column switch module ⇒ Electrical system; Rep. gr. 94; Steering column switch module; Removing and installing steering column switch module.
- Driver side airbag unit ⇒ General body repairs, interior; Rep. gr. 69; Driver side airbag; Assembly overview - driver side airbag.
- Lower steering column trim ⇒ General body repairs, interior; Rep. gr. 68; Compartments/covers; Removing and installing lower steering column trim.
- Upper steering column trim ⇒ General body repairs, interior; Rep. gr. 68; Compartments/covers; Removing and installing upper steering column trim.