
1.2 TDI CR engine (EA189) · Crankshaft group · Cylinder block, gearbox end
Removing and installing sealing flange on gearbox side
⇒ 2.3.1 Pressing out sealing flange with sender wheel
⇒ 2.3.2 Pressing in sealing flange with sender wheel
⇒ 2.3.3 A - Assemble seal with sender wheel on assembly tool T10134.
⇒ 2.3.4 B - Fitting assembly tool T10134 with sealing flange to crankshaft flange
⇒ 2.3.5 C - Bolting assembly tool T10134 onto crankshaft flange
⇒ 2.3.6 D - Pressing sender wheel onto crankshaft flange using assembly tool T10134
⇒ 2.3.7 E - Checking sender wheel installation position on crankshaft
⇒ 2.3.8 f) Re-pressing sender wheel
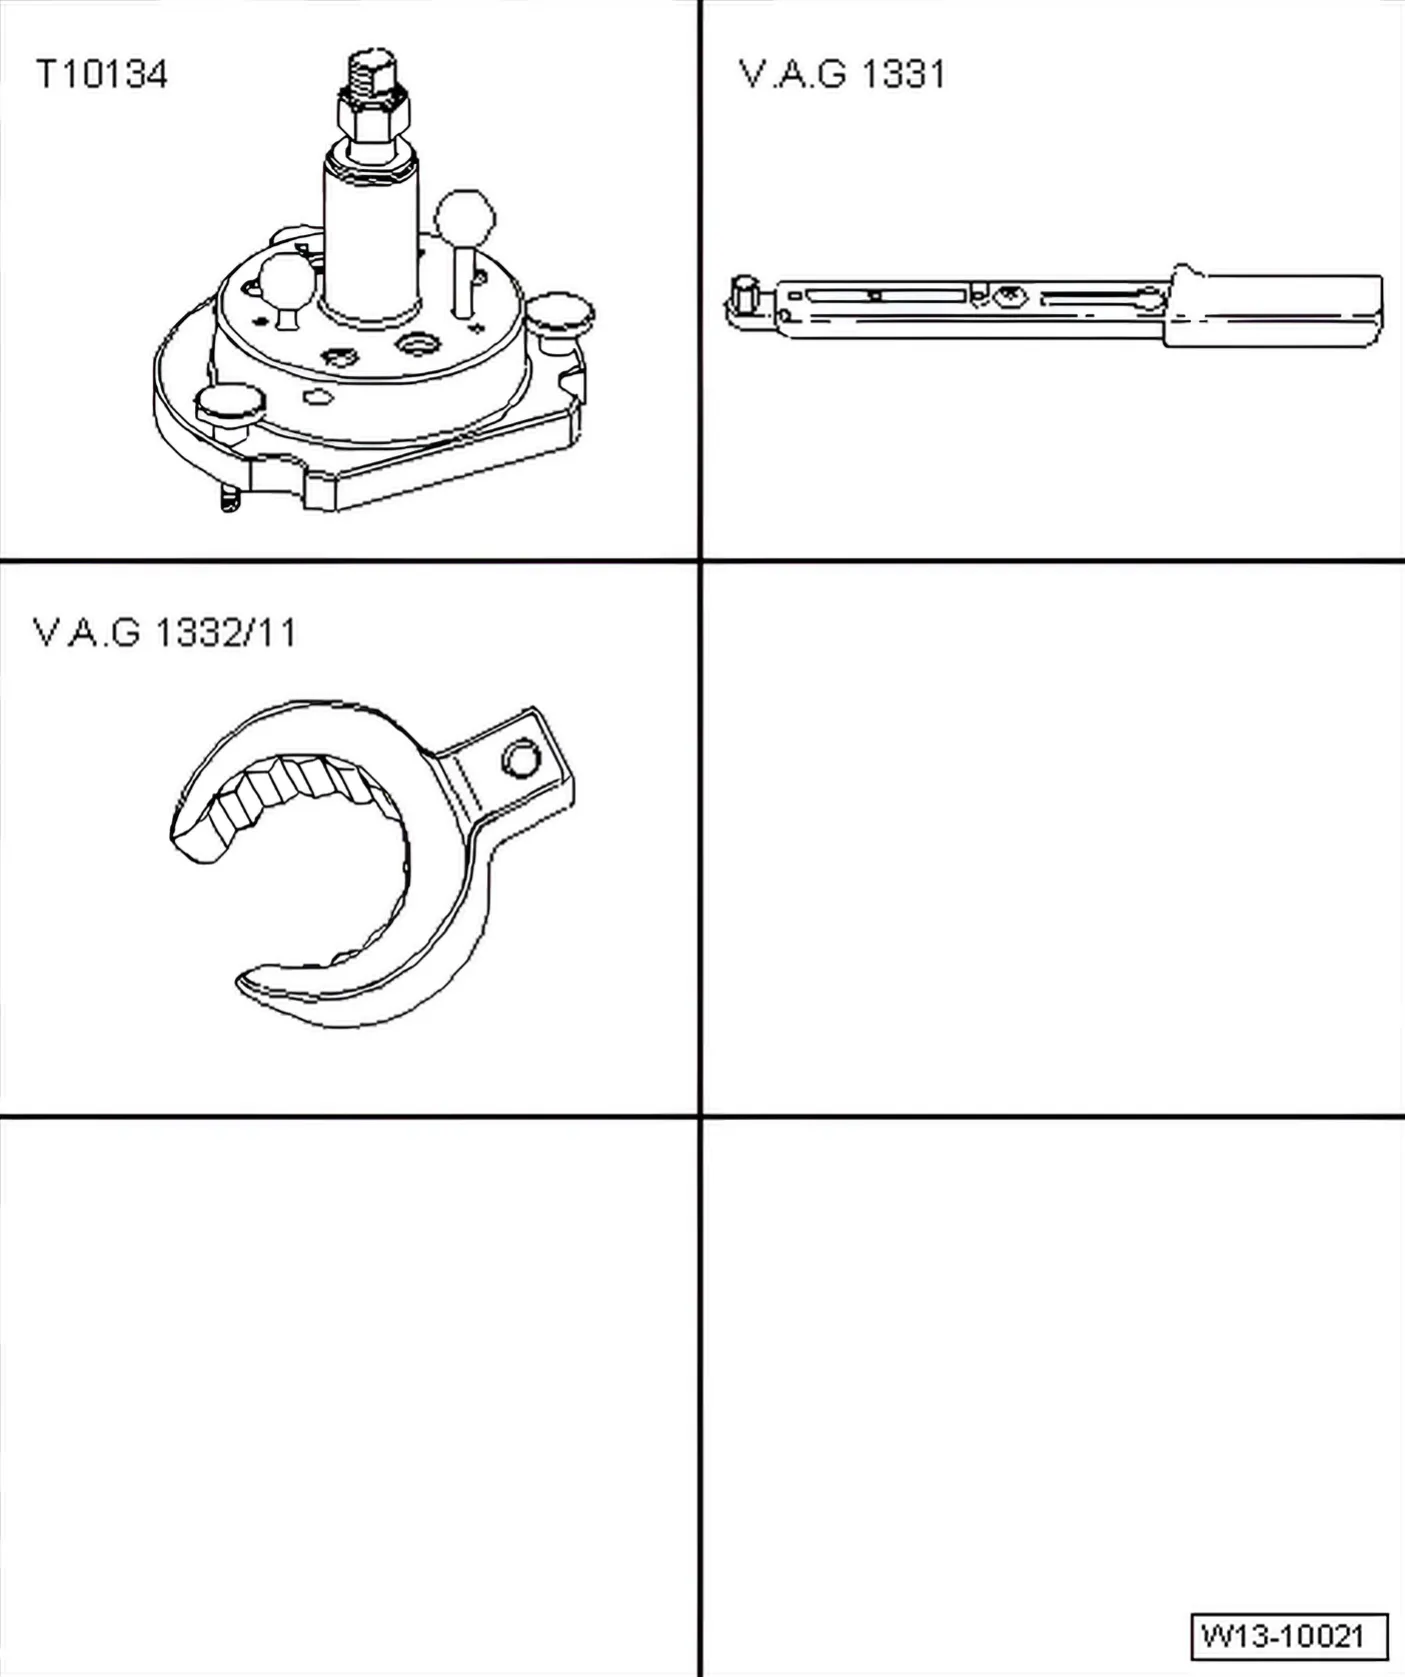
Special tools and workshop equipment required
- Assembly tool - T10134-
- Torque wrench - V.A.G 1331-
- Tool insert 24 mm - V.A.G 1332/11-
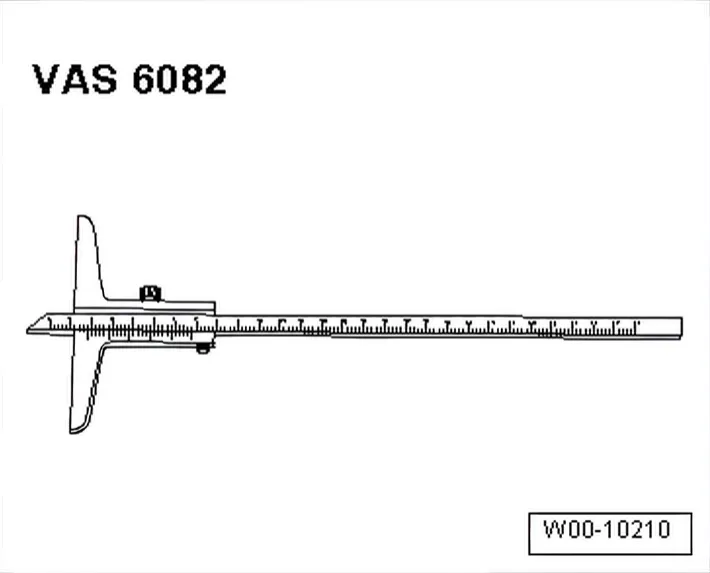
- Depth gauge - VAS 6082-
- 3 hexagon bolts M6 x 35 mm
- 2 hexagon bolts M7 x 35 mm
2.3.1 Pressing out sealing flange with sender wheel
- Removing gearbox ⇒ Rep. gr. 34; Removing and installing gearbox.
- Remove flywheel.
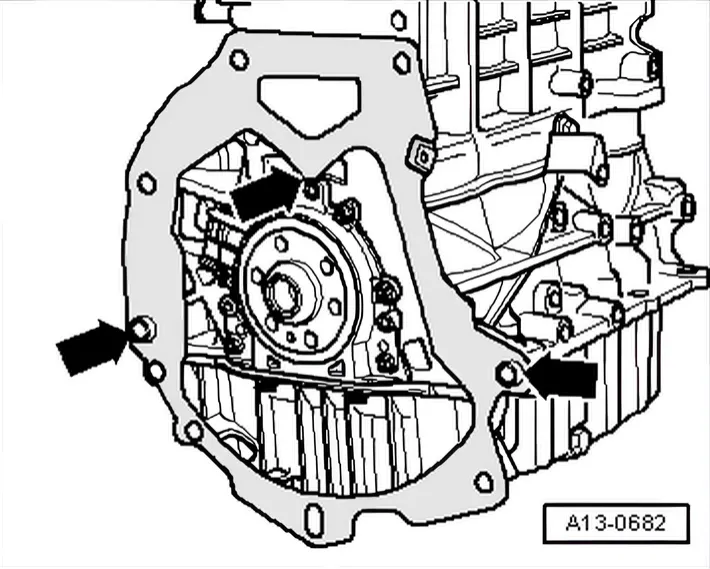
- Detach intermediate plate at sealing flange and dowel pins -arrows-.

- Turn crankshaft at bolt for toothed belt pulley until crankshaft is at “TDC” of cyl. 1.
- Remove sump ⇒ 1.3 Removing and installing sump.
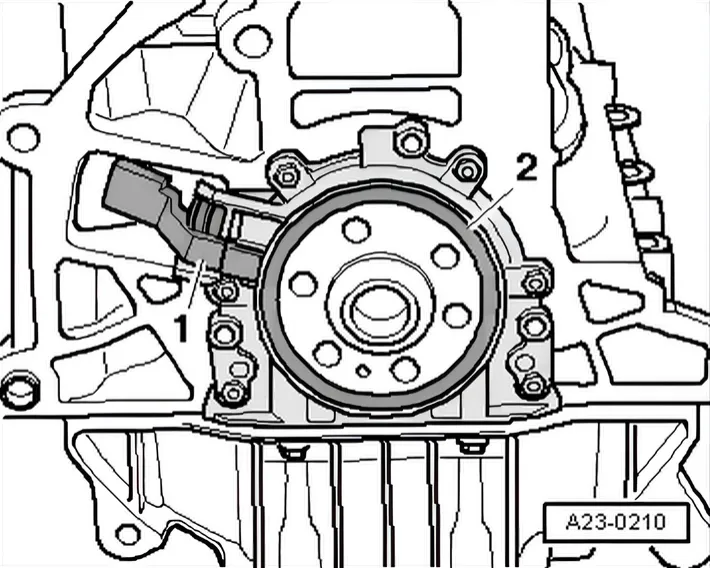
- Remove engine speed sender - G28- -1- ⇒ 1.4.1 Removing.
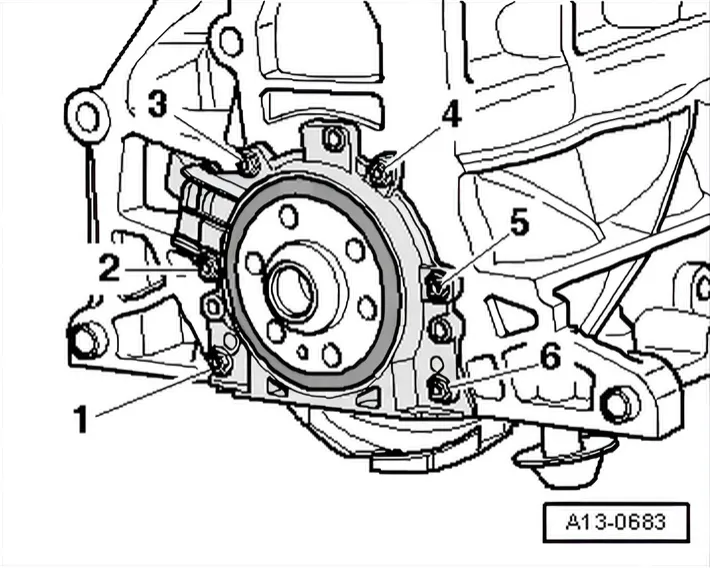
- Remove bolts for sealing flange -1 … 6-.
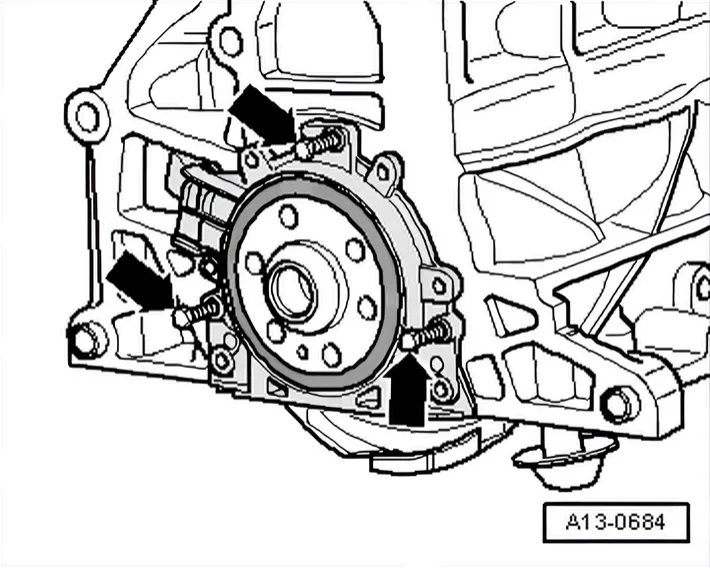
- To press out, screw in 3 bolts M6x35 -arrows- alternately into sealing flange not more than 1/2 turn at a time.
- Remove sealing flange with sender wheel.
2.3.2 Pressing in sealing flange with sender wheel
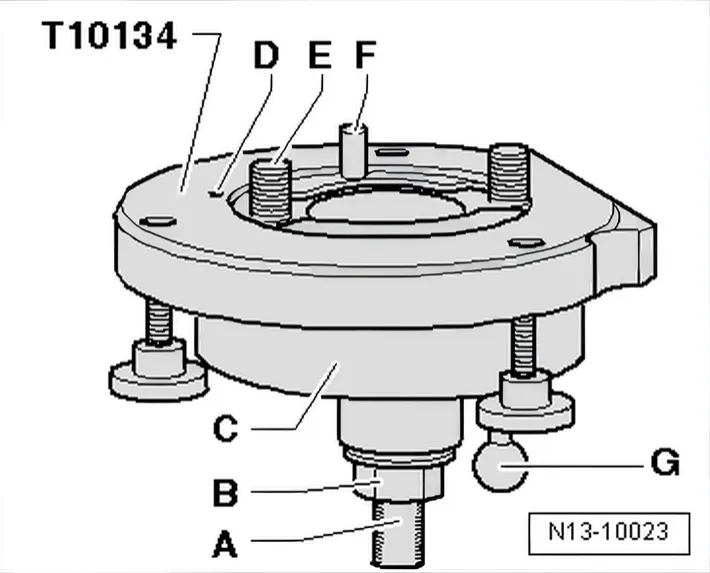
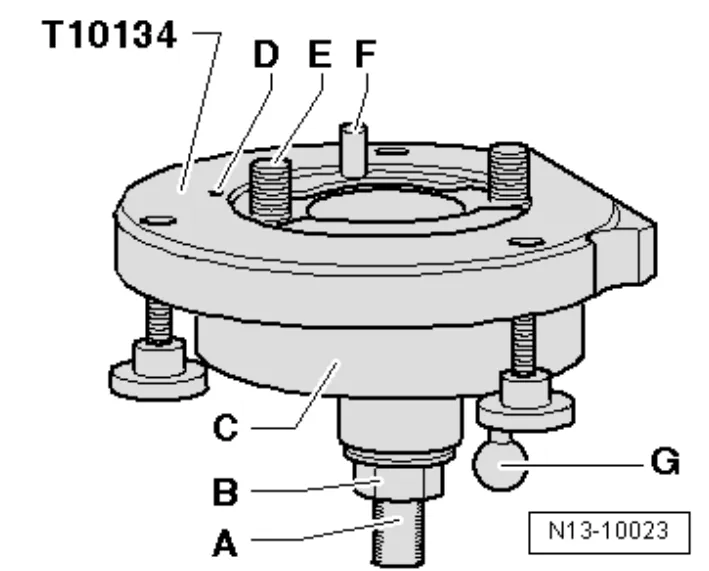
Assembly tool - T10134-
A - Clamping surface
B - Hexagon nut
C - Assembly housing
D - Locating pin
E - Hexagon socket head bolt
F - Guide pin for diesel engines (black knob)
G - Guide pin for petrol engines (red knob)
2.3.3 A - Assemble seal with sender wheel on assembly tool - T10134-.
- Screw on hexagon nut -B- until just before it touches the clamping surface -A- of the threaded spindle.
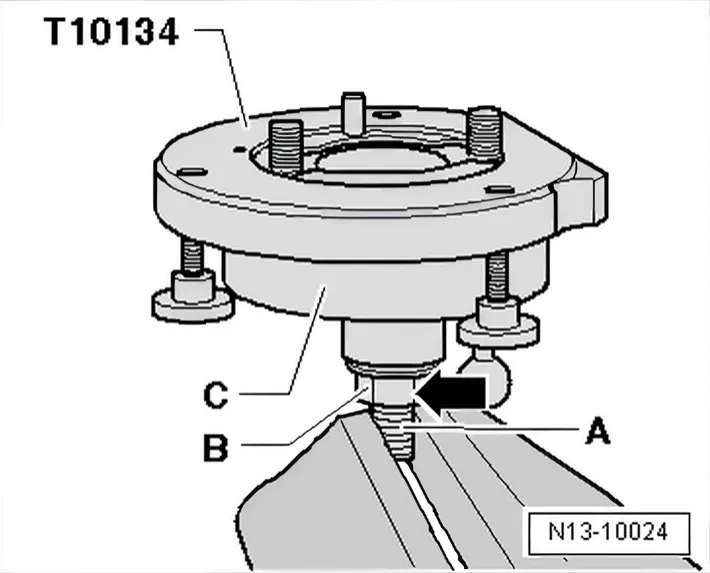
- Clamp assembly tool - T10134- in a vice on clamping surface
- A- of threaded spindle.
- Press assembly housing -C- downwards until it lies on hexagon nut -B- -arrow-.
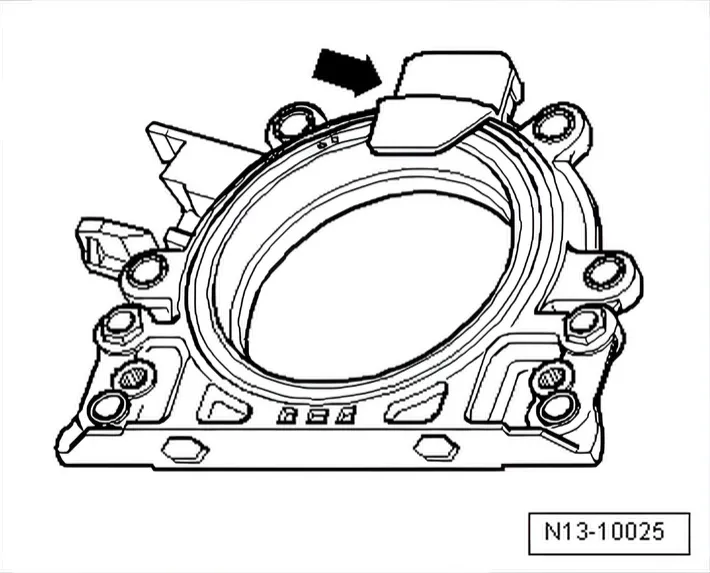
- Remove securing clip -arrow- from new sealing flange.
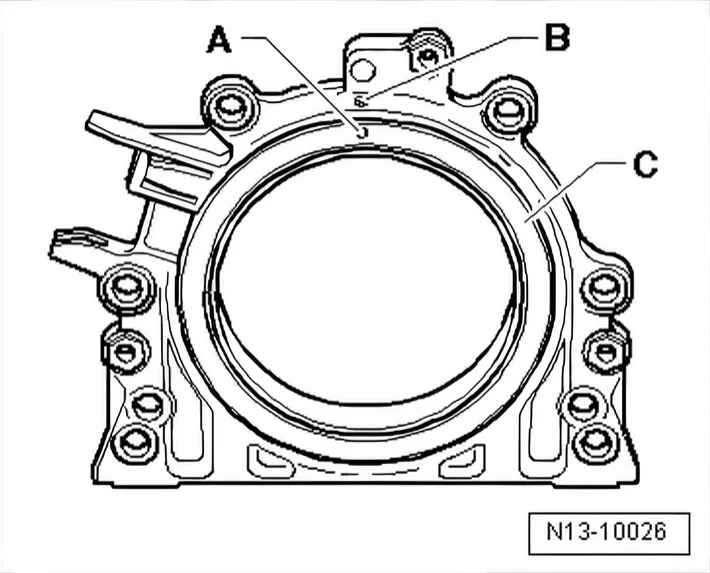
- Locating hole -A- on sender wheel -C- must align with marking
- B- on sealing flange.
- Place sealing flange with front side facing down on a clean, level surface.
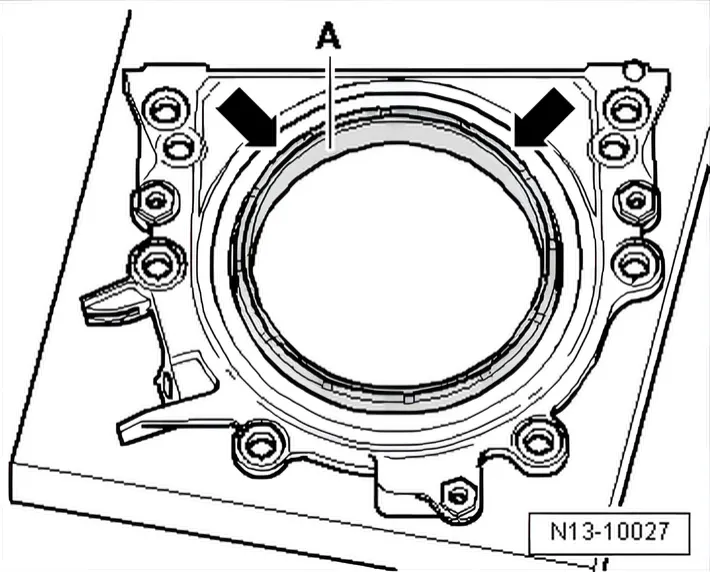
- Push sealing lip support ring -A- downwards in direction of arrow until it lies on flat surface.

- Upper edge of sender wheel and front edge of sealing flange must align -arrows-.
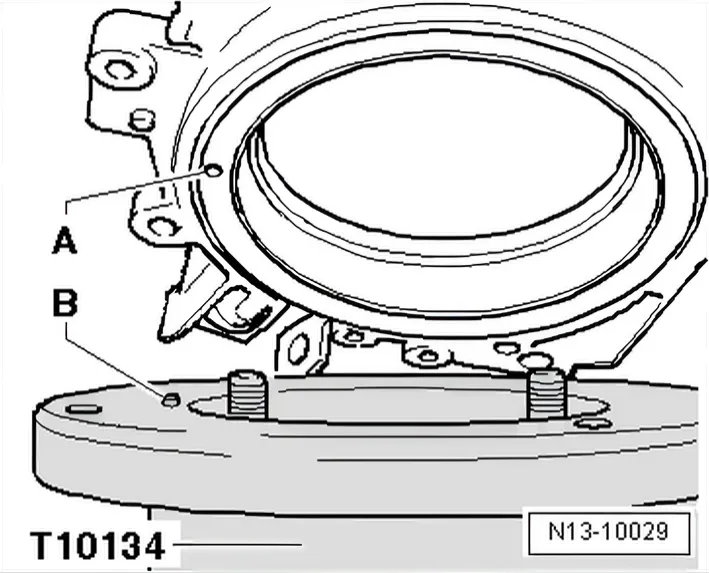
- Fit sealing flange with front side facing downwards onto assembly tool - T10134- so that locating pin -B- can be inserted in sender wheel hole -A-.
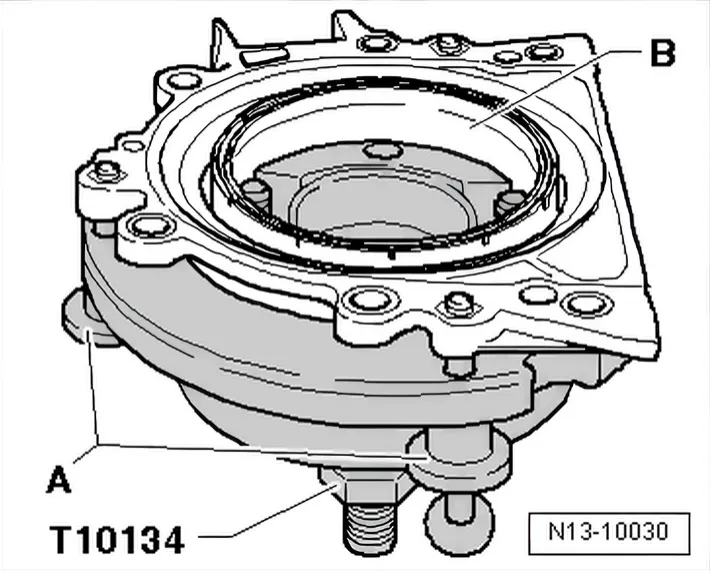
- Press sealing flange and sealing lip support ring -B- against surface of assembly tool - T10134- whilst tightening the 3 knurled screws -A-.
This prevents locating pin from slipping out of sender wheel hole.
2.3.4 B - Fitting assembly tool - T10134- with sealing flange to crankshaft flange
- Crankshaft flange must be free of oil and grease.
- Engine positioned at TDC of cylinder no. 1.
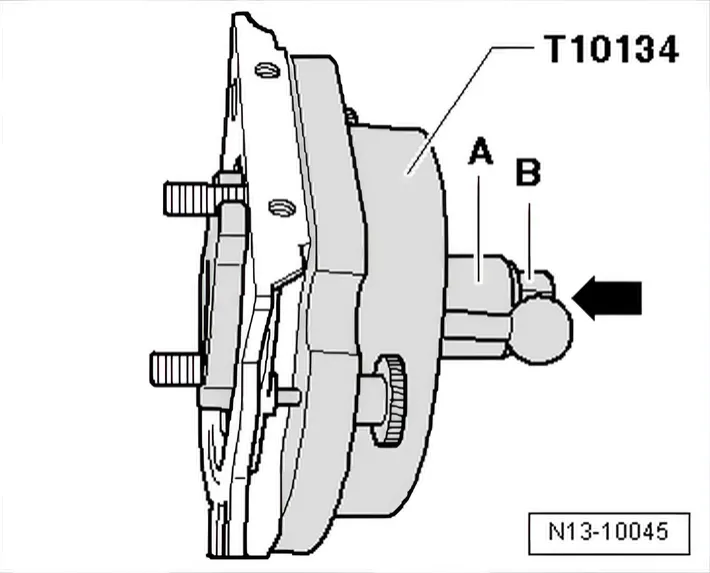
- Screw hexagon nuts -B- to end of threaded spindle.
- Press threaded spindles of assembly tool - T10134- in direction of arrow, until hexagon nut -B- lies against assembly housing -A-.
- Align flat side of assembly housing to crankcase's sealing surface on the oil sump side.
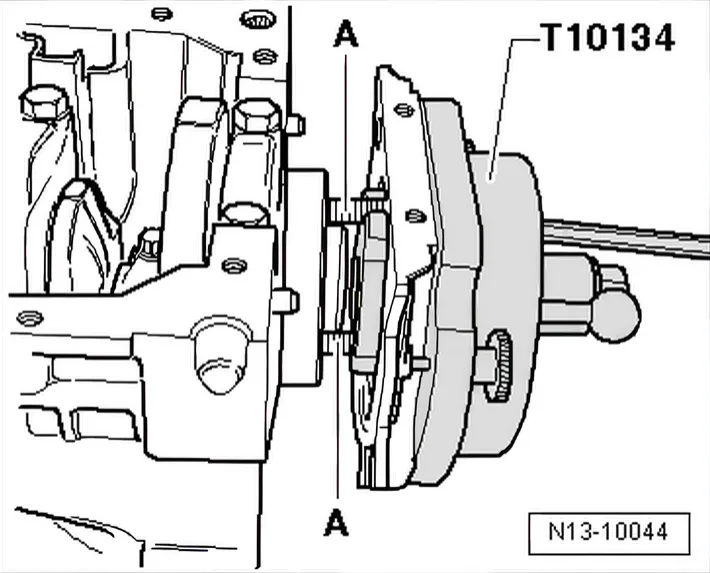
- Secure assembly tool - T10134- to crankshaft flange with hexagon socket head bolts -A-.
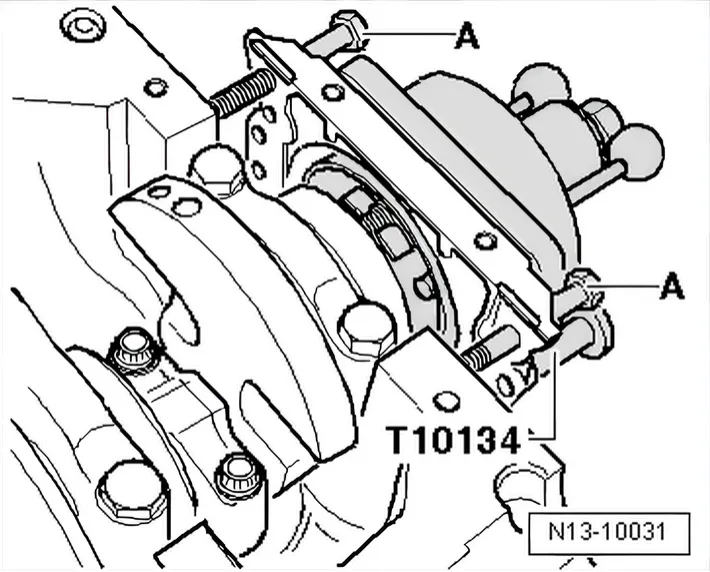
- To guide sealing flange into cylinder block, screw in 2 M7 × 35 mm bolts -A-.
2.3.5 C - Bolting assembly tool - T10134- onto crankshaft flange
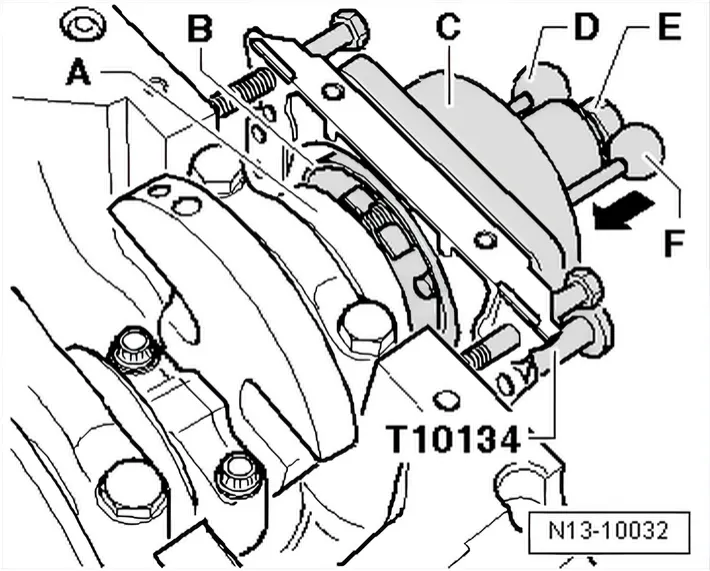
- Push assembly housing -C- by hand in direction of arrow until sealing lip support ring -B- touches crankshaft flange -A-.
- Push guide pin for diesel engines (black knob) -D- into hole in crankshaft. This ensures that the sender wheel reaches its final installation position.
- Tighten the two hexagon socket head bolts of the assembly tool hand-tight.
- Screw hexagon nut -E- onto threaded spindle by hand until it lies on assembly housing -C-.
2.3.6 D - Pressing sender wheel onto crankshaft flange using assembly tool - T10134-
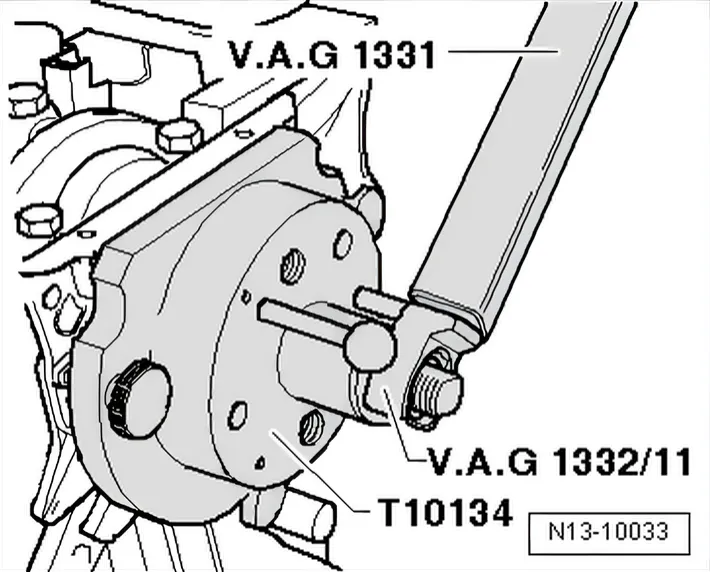
- Tighten hexagon nut of assembly tool - T10134- with torque wrench - V.A.G 1331- and tool insert - V.A.G 1332/11- to 35 Nm.
2.3.7 E - Checking sender wheel installation position on crankshaft
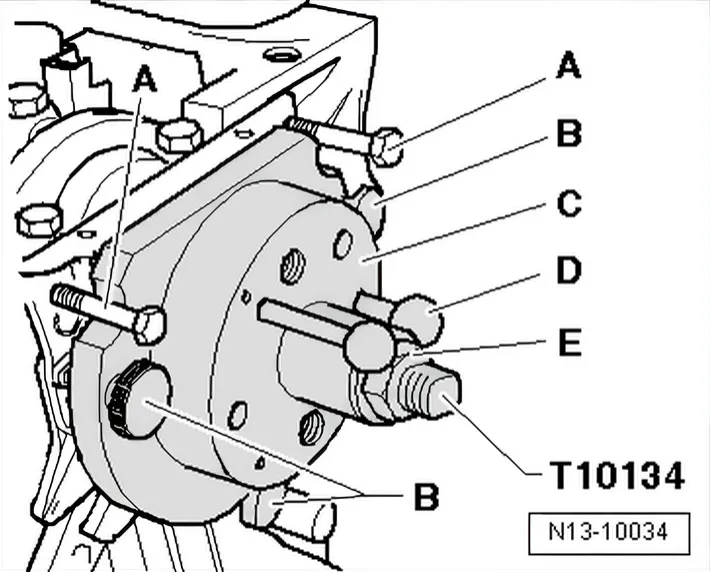
- Screw hexagon nut -E- to end of threaded spindle.
- Unscrew the two bolts -A- from the cylinder block.
- Unscrew the three knurled screws -B- out of sealing flange.
- Remove assembly tool - T10134-.
- Remove sealing lip support ring.
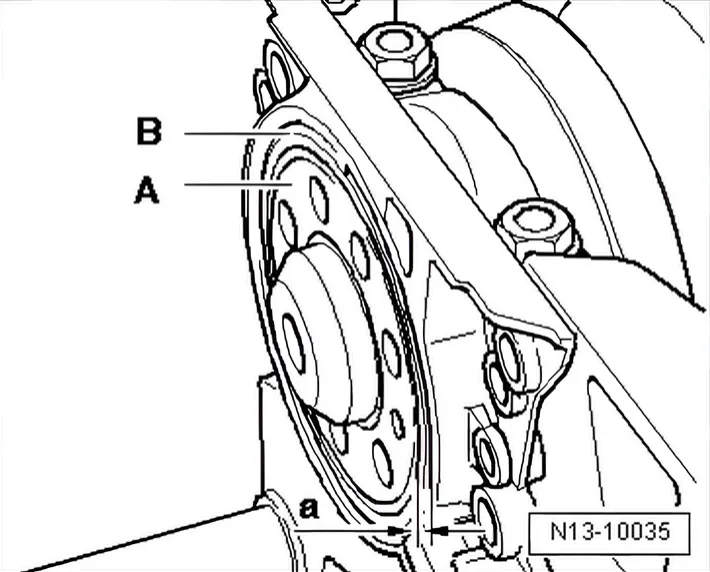
- The sender wheel is exactly in the installation position on the crankshaft if a gap -a- = 0.5 mm exists between crankshaft flange -A- and sender wheel -B-.
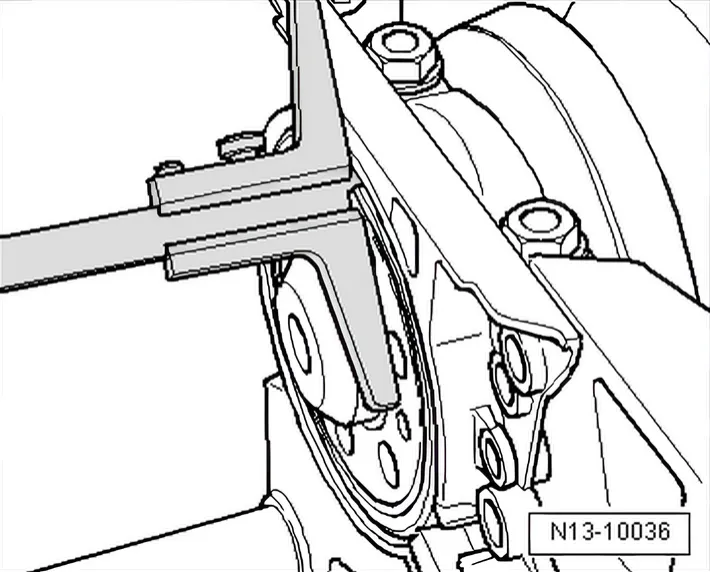
- Place caliper gauge on crankshaft flange.
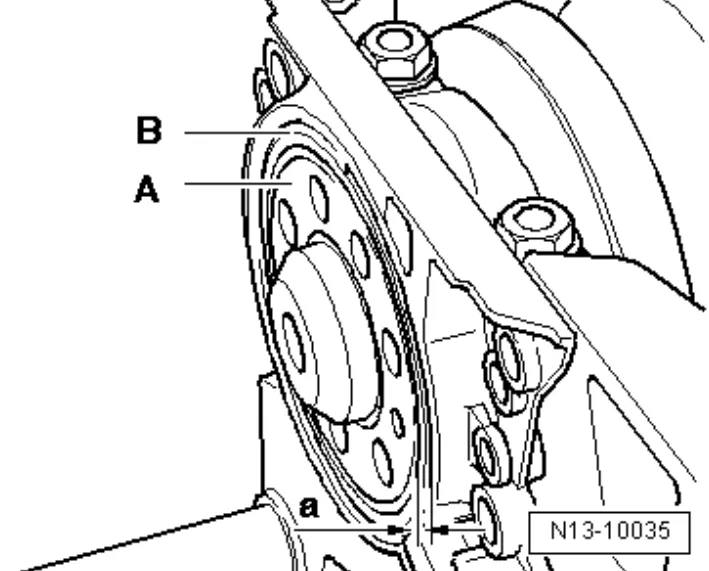
- Measure distance between crankshaft flange -A- and sender wheel -B-.
- Specification: dimension -a- = 0.5 mm
- Re-press sender wheel ⇒ 2.3.8 f) Re-pressing sender wheel.
If dimension -a- is attained:
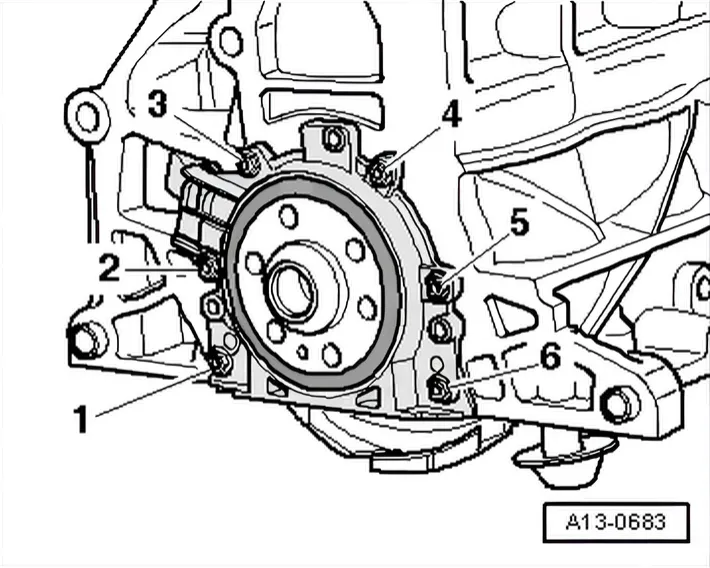
- Tighten bolts for sealing flange.
- Tighten bolts in 2 stages as follows:
| Stag e | Bolts | Specified torque |
|---|---|---|
| 1) | -1 … 6- | Screw in by hand as far as stop |
| 2) | -1 … 6- | In diagonal sequence and in stages; final torque 15 Nm |
- Install engine speed sender - G28- ⇒ 1.4.1 Removing.
- Install sump ⇒ 1.3 Removing and installing sump.
- Install intermediate plate.
- Install flywheel with new bolts. Tighten securing bolts to 60 Nm + turn 90° further.
2.3.8 f) Re-pressing sender wheel
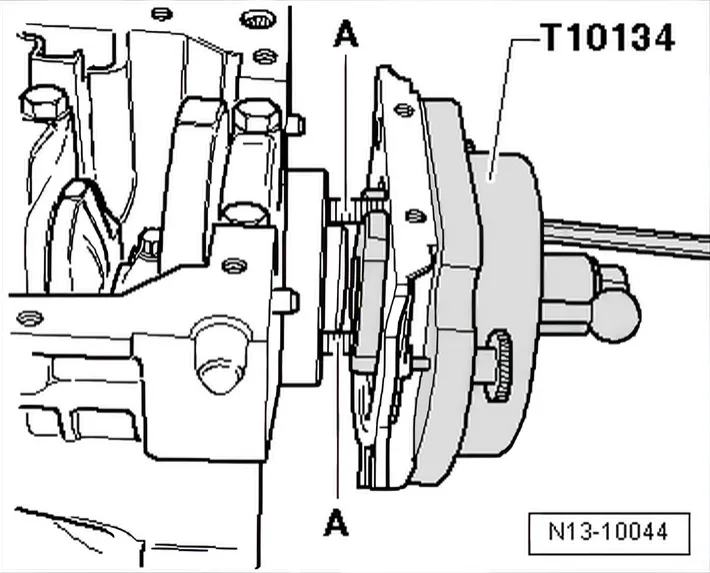
- Secure assembly tool - T10134- to crankshaft flange with hexagon socket head bolts -A-.
- Tighten the two hexagon socket head bolts hand-tight.
- Push assembly tool - T10134- against the sealing flange by hand.
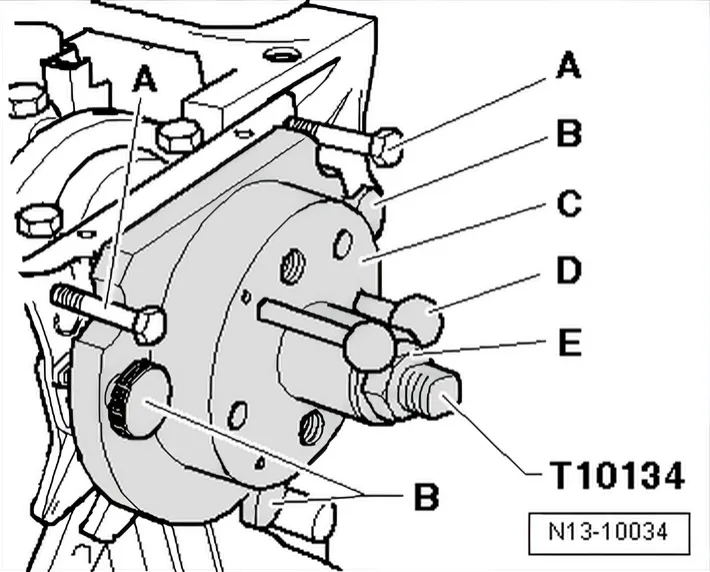
- Screw hexagon nut -E- onto threaded spindle by hand until it lies on assembly housing -C-.
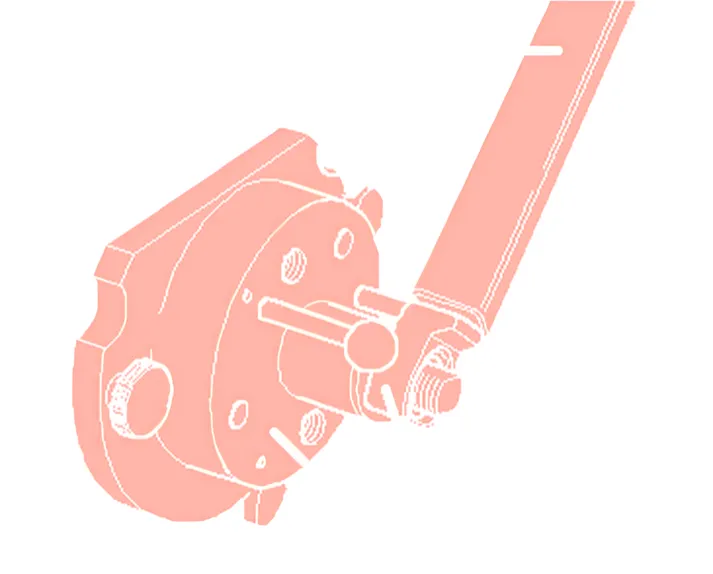
- Tighten hexagon nut of assembly tool - T10134- with torque wrench - V.A.G 1331- and tool insert - V.A.G 1332/11- to 40 Nm.
- Check the sender wheel installation position on crankshaft again ⇒ 2.3.5 C - Bolting assembly tool - T10134- onto crankshaft flange.
If dimension -a- is still too small:
- Tighten hexagon nut of assembly tool - T10134- to 45 Nm.
- Check the sender wheel installation position on crankshaft again ⇒ 2.3.5 C - Bolting assembly tool - T10134- onto crankshaft flange.