
1.4 TSI engine (EA111) · Crankshaft group · Cylinder block (pulley end)
Cylinder block, belt pulley end – assembly overview and fastening
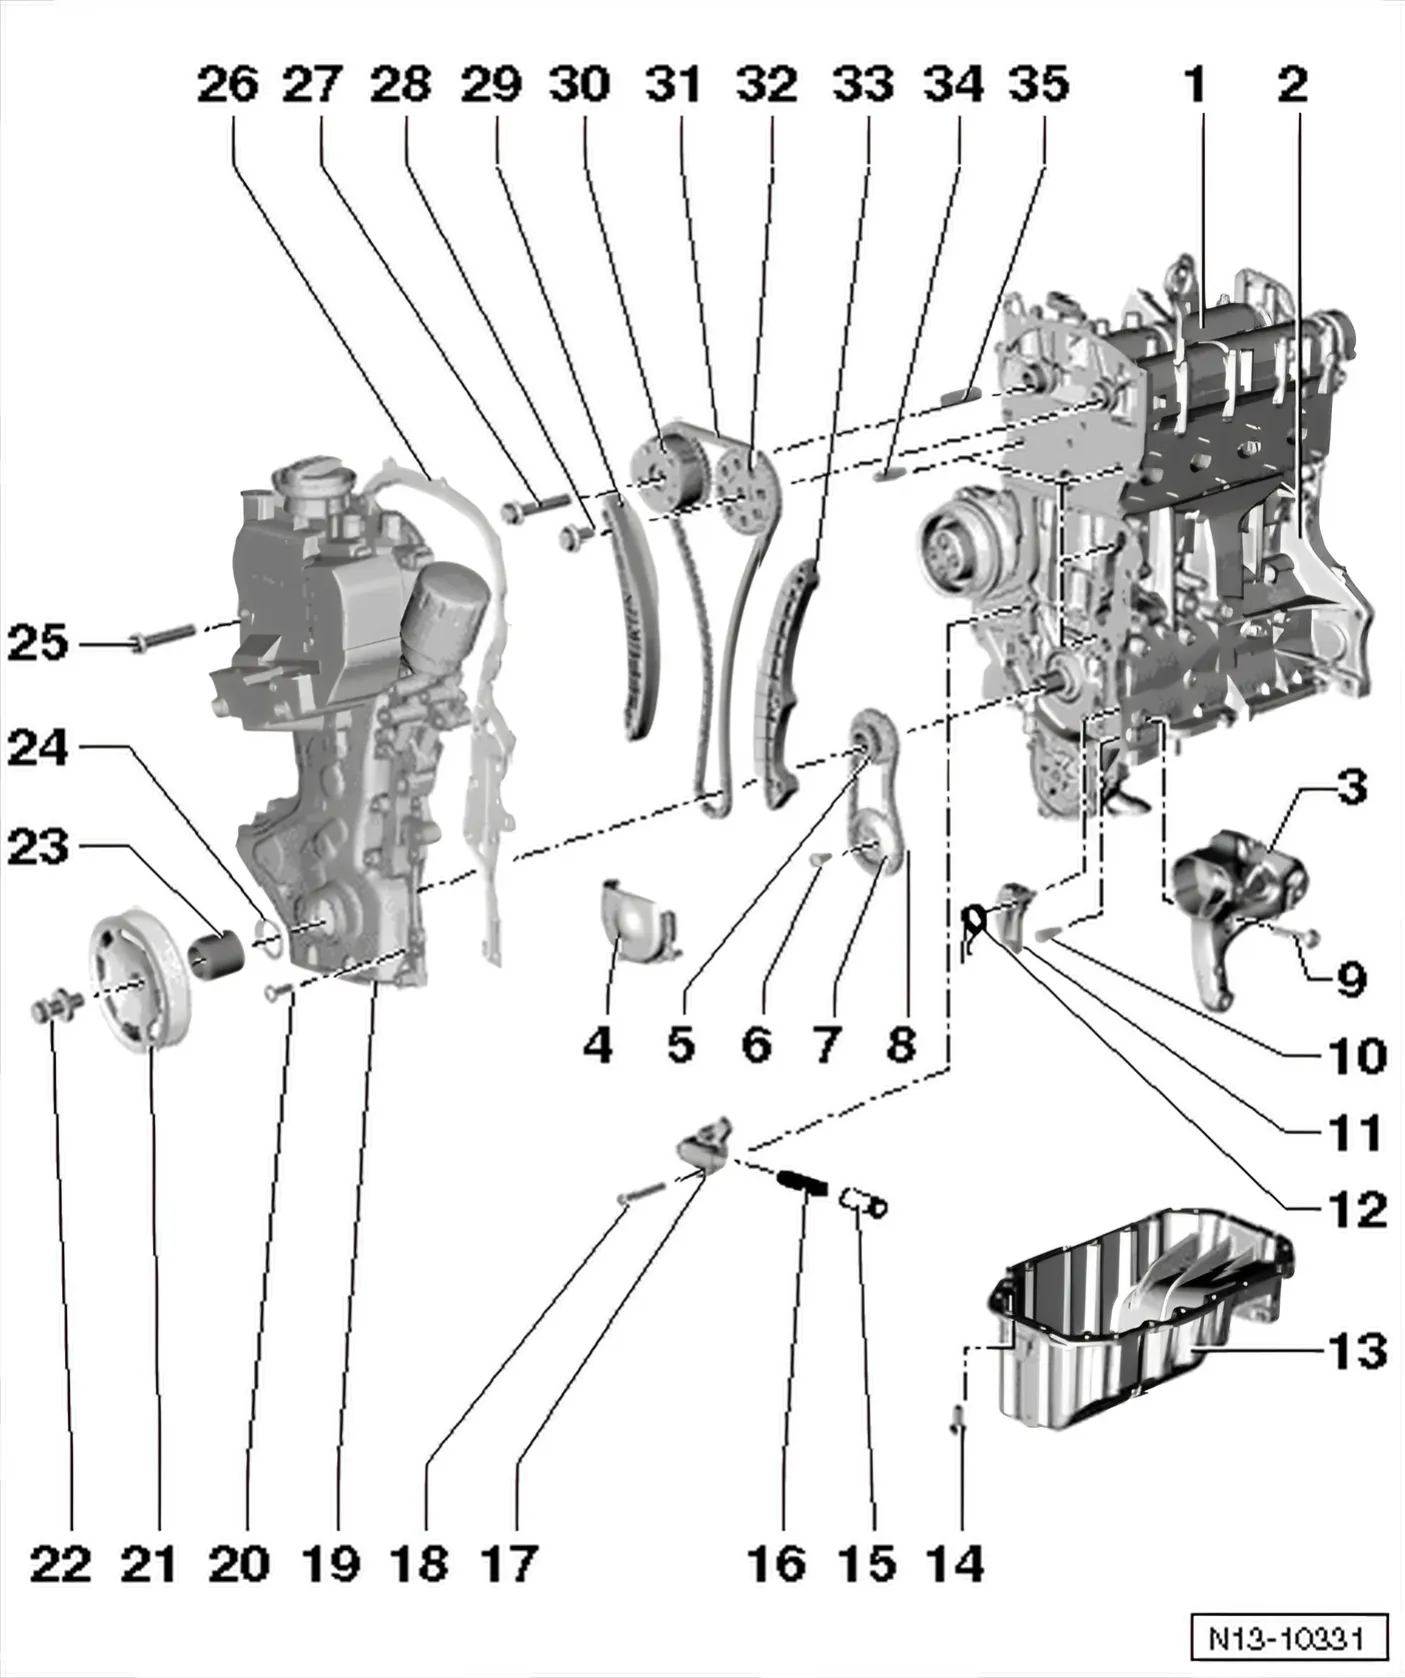
- 1 Cylinder head with camshaft housing
- Removing and installing ⇒ 1.3 Removing and installing cylinder head
- Do not rework sealing surface.
- With integrated camshaft bearings.
- Remove sealant residue.
- When installing, insert vertically from above so that dowel pins fit into holes in cylinder head
- 2 Cylinder block
- Dismantling and assembling cylinder block ⇒ 2.1 Assembly overview - cylinder block, gearbox end.
- Dismantling and assembling pistons and conrods ⇒ 4 Pistons and conrods
- 3 Ancillary bracket
- For tensioning element and air conditioner compressor
- Removing and installing ⇒ 1.5 Removing and installing bracket for ancillaries
- 4 Cover
- 5 Sprocket
- For oil pump drive and timing chain.
- Contact surfaces must be free of oil and grease.
- 6 20 Nm + 1/4 turn (90°) further
- Renew
- 7 Sprocket
- Lock chain sprocket using counterhold - T10172-.
- 8 Drive chain
- Before removing, mark direction of rotation (installation position).
- 9 25 Nm
- 10 Locating pin for chain tensioner
- Specified torque: 8 Nm
- 11 Chain tensioner with tensioning rail
- For oil pump drive.
- Specified torque: 8 Nm
- 12 Spring
- 13 Oil pan
- Removing and installing ⇒ 1.3 Removing and installing sump
- Clean sealing surface before fitting.
- Install with silicone sealant - D 176 600 A1-.
- 14 13 Nm
- 15 Piston
- For drive chain tensioner
- 16 Compression spring
- 17 Chain tensioner
- 18 9 Nm
- 19 Valve timing housing
- Removing and installing ⇒ 3 Cover for timing chain
- Additionally install with silicone adhesive sealant - D 176 501 A1-.
- To facilitate guidance on installation, screw two “M6x80” studs into camshaft housing and cylinder block.
- To guide valve timing housing, secure sump in position with two bolts.
- 20 10 Nm
- 21 Belt pulley
- With diamond coated washer
- Observe note on diamond coated washers ⇒ 1.6 Renewing crankshaft oil seal - pulley end.
- Note tightening sequence ⇒ 1.7 Removing and installing crankshaft pulley.
- Contact surfaces must be free of oil and grease.
- Secure belt pulley against turning with counterhold - 3415-.
- Removing and installing ⇒ 1.7 Removing and installing crankshaft pulley
- 22 Securing bolt
- Removing and installing crankshaft pulley ⇒ 1.7 Removing and installing crankshaft pulley
- Renew
- Contact surface for securing bolt must be free of oil and grease.
- Oil threads before inserting.
- Secure belt pulley against turning with counterhold - 3415-.
- The turning further angle can be measured with a commercial protractor.
- 23 Bearing bush
- Contact surfaces must be free of oil and grease.
- 24 O-ring
- Renew
- 25 50 Nm
- 26 Seal
- 27 40 Nm + 1/4 turn (90°) further
- Lock sprockets using counterhold - T10172-.
- Bolt with left-hand thread.
- Renew
- 28 50 Nm + 1/4 turn (90°) further
- Renew
- 29 Tensioning rail
- 30 Camshaft adjuster
- Removing and installing ⇒ 4.2 Adjusting valve timing
- Must not be dismantled.
- 31 Timing chain
- Removing and installing ⇒ 4.4 Removing and installing timing chain and chain drive for oil pump
- 32 Sprocket
- Removing and installing ⇒ 4.4 Removing and installing timing chain and chain drive for oil pump
- For exhaust camshaft
- Lock sprockets using counterhold -T10172-.
- 33 Slide rail
- For timing chain
- 34 Guide pin
- Specified torque: 20 Nm
- 35 Bearing bush