
Body repairs – exterior · Bumpers · Bumper, rear
Removing and installing bumper cover
⇒ 2.4.1 Removing and installing bumper cover, Polo, standard equipment version
⇒ 2.4.2 Removing and installing bumper cover, Polo BlueMotion
⇒ 2.4.3 Removing and installing bumper cover, CrossPolo
⇒ 2.4.4 Removing and installing bumper cover, Polo GTI, Polo BlueGT
⇒ 2.4.5 Removing and installing bumper cover, Polo R-Line
2.4.1 Removing and installing bumper cover, Polo, »standard« equipment version
Special tools and workshop equipment required
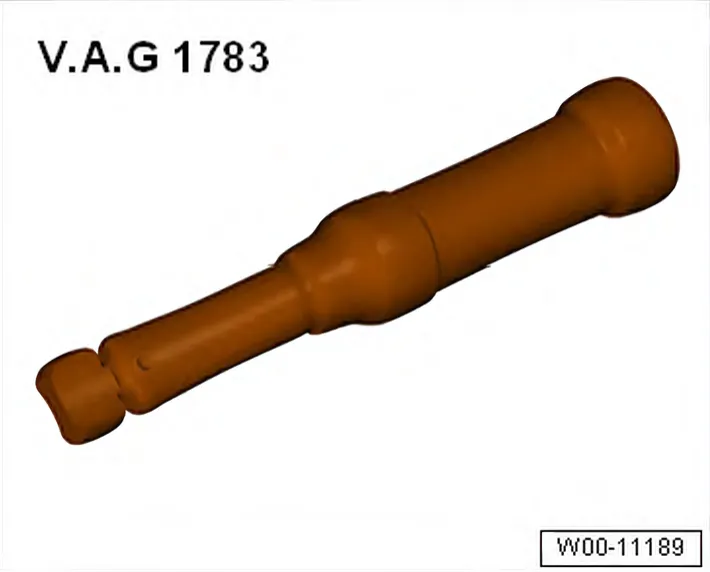
- Torque wrench - V.A.G 1783-

Removing
- Remove tail lights ⇒ Electrical system; Rep. gr. 94; Tail lights; Removing and installing tail light.
Instructions and work specifications for the Park Assist system ⇒ Electrical system; Rep. gr. 94; Park Assist system (PA)
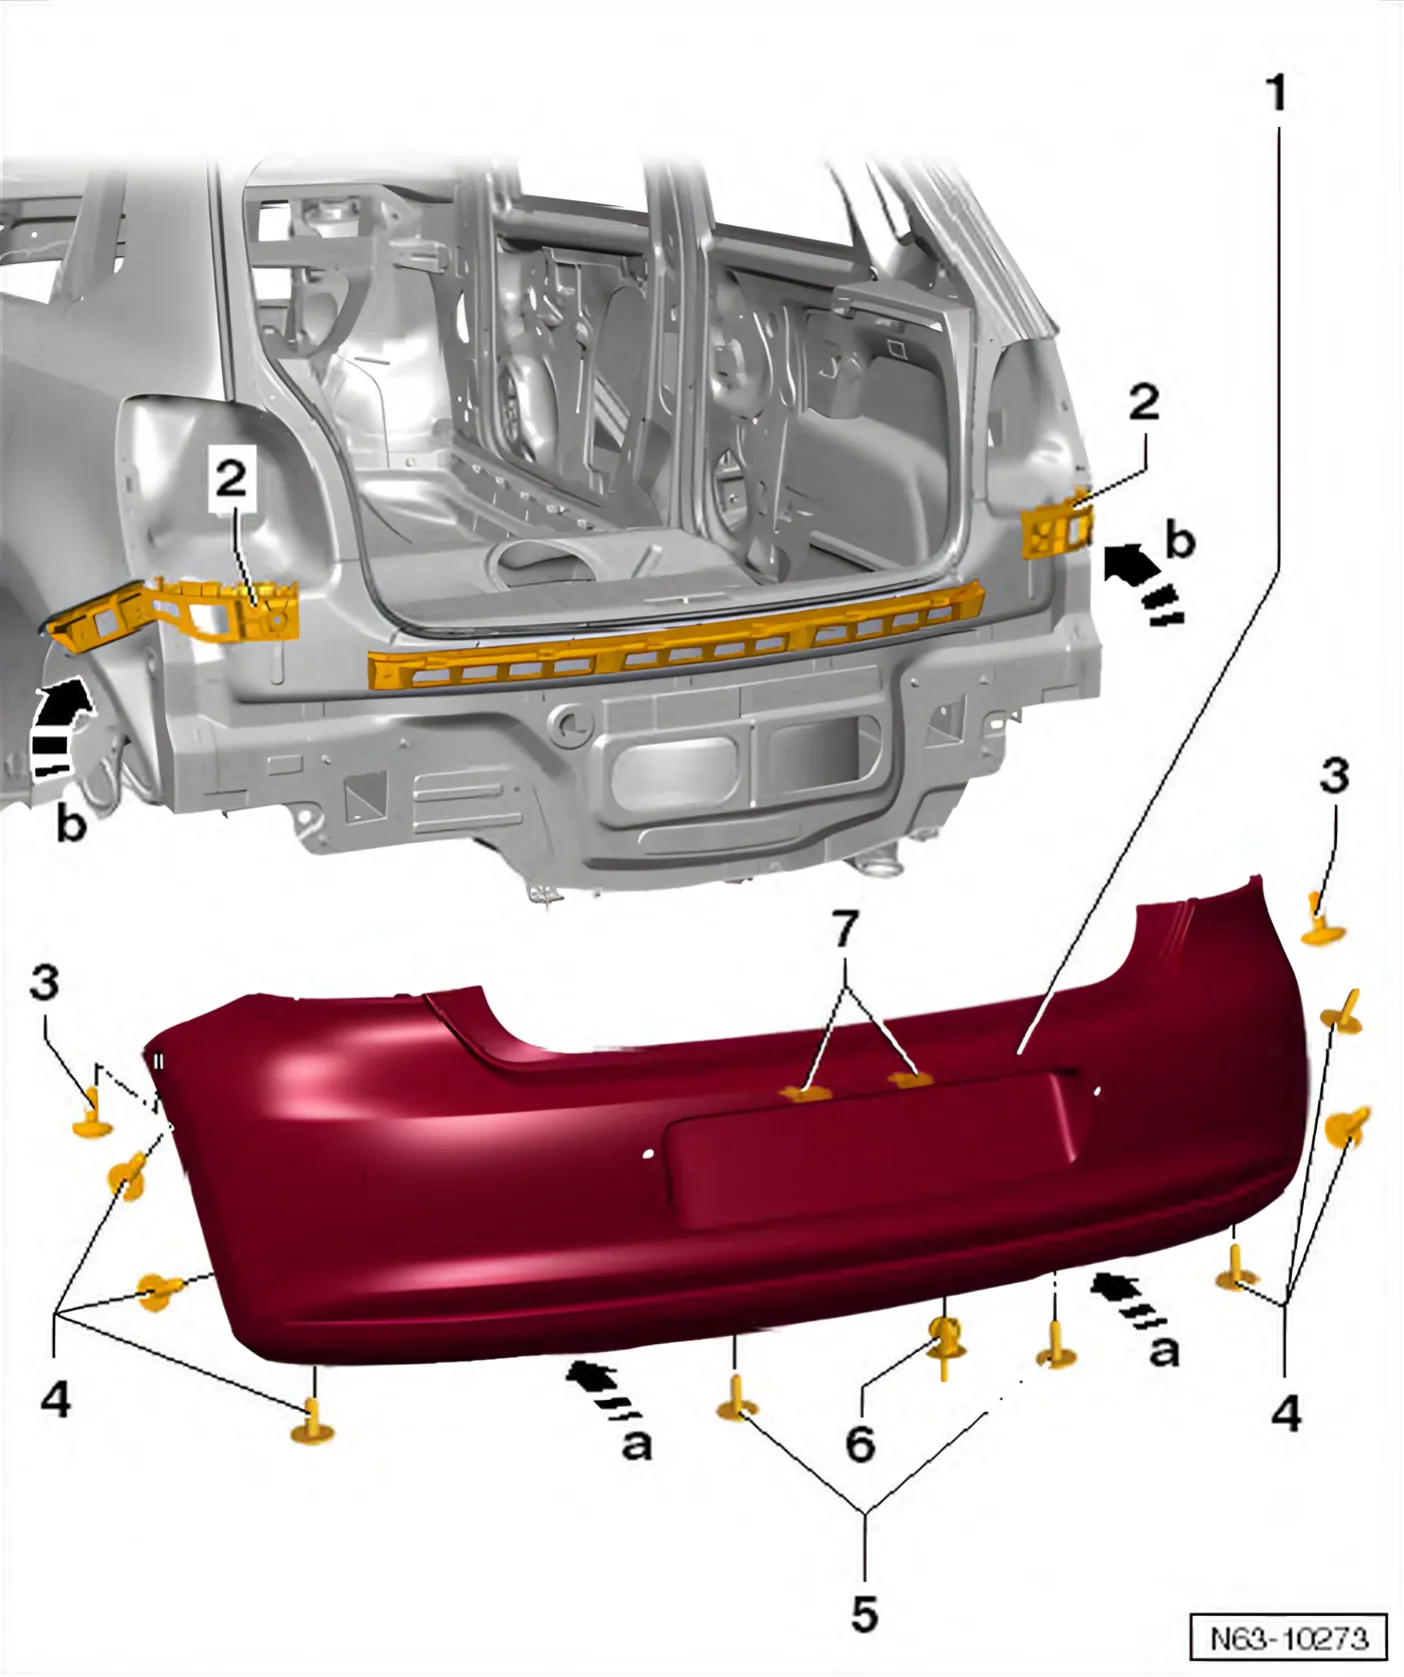
- Remove bolts -4- on left and right sides in area of wheel housing liner.
- Unscrew bolts -3- (pointing upwards) on left and right.
- Unscrew bolts -6- and detach clip -7-.
- Pull rear bumper cover -1- out of fasteners in lateral guides -arrows b-.
Further removal requires the help of a second mechanic.
- Release fasteners -arrows a- at lateral guides -2-.
- Pull rear bumper cover -1- parallel off vehicle -arrows c-.
- Remove connectors of all installed electrical components.
Instructions and work specifications for the Park Assist system ⇒ Electrical system; Rep. gr. 94; Park Assist system (PA)
Installing
- Fit rear bumper cover -1- with the aid of a second mechanic -arrows a-.
- Secure all existing connectors in place.
Instructions and work specifications for the Park Assist system ⇒ Electrical system; Rep. gr. 94; Park Assist system (PA)
- Push rear bumper cover -1- onto centre guide profile and onto left and right guide profile -arrows b- until they engage audibly with each other.
- Ensure that gaps and shut lines are parallel and specified dimensions are maintained ⇒ Body Repairs; Rep. gr. 00; Body panel gaps/shut lines; Body - rear.
- Fit bolts -3, 4 and 5- in place, and tighten them to respective specified torque ⇒ 2.1.1 Assembly overview – bumper cover, Polo, »standard« equipment version.
- Fasten clip -6-.
2.4.2 Removing and installing bumper cover, Polo »BlueMotion«
Special tools and workshop equipment required
- Torque wrench - V.A.G 1783-

Removing
- Remove tail lights ⇒ Electrical system; Rep. gr. 94; Tail lights; Removing and installing tail light
- Remove bolts -4- on left and right sides in area of wheel housing liner.
- Remove bolts -3- (pointing upwards) on left and right.
- Unscrew bolts -6-.
- Release clip -7-
- Pull rear bumper cover -1- out of fasteners in lateral guides -2- -arrows b-.
Further removal requires the help of a second mechanic.
- Release fasteners -arrows a- at lateral guides -2-.
- Pull rear bumper cover -1- parallel off vehicle -arrows c-.
- Disconnect connectors from all existing electrical components.

Installing
- Reconnect all connectors
- Fit rear bumper cover -1- with the aid of a second mechanic -arrows a-.
- Push rear bumper cover -1- onto centre guide profile and onto left and right guide profile -2- -arrows b-, until they engage audibly.
- Fit bolts -3, 4 and 5- in place, and tighten them to respective specified torque ⇒ 2.1.2 Assembly overview – bumper cover, Polo BlueMotion.
- Fasten clip -6-.
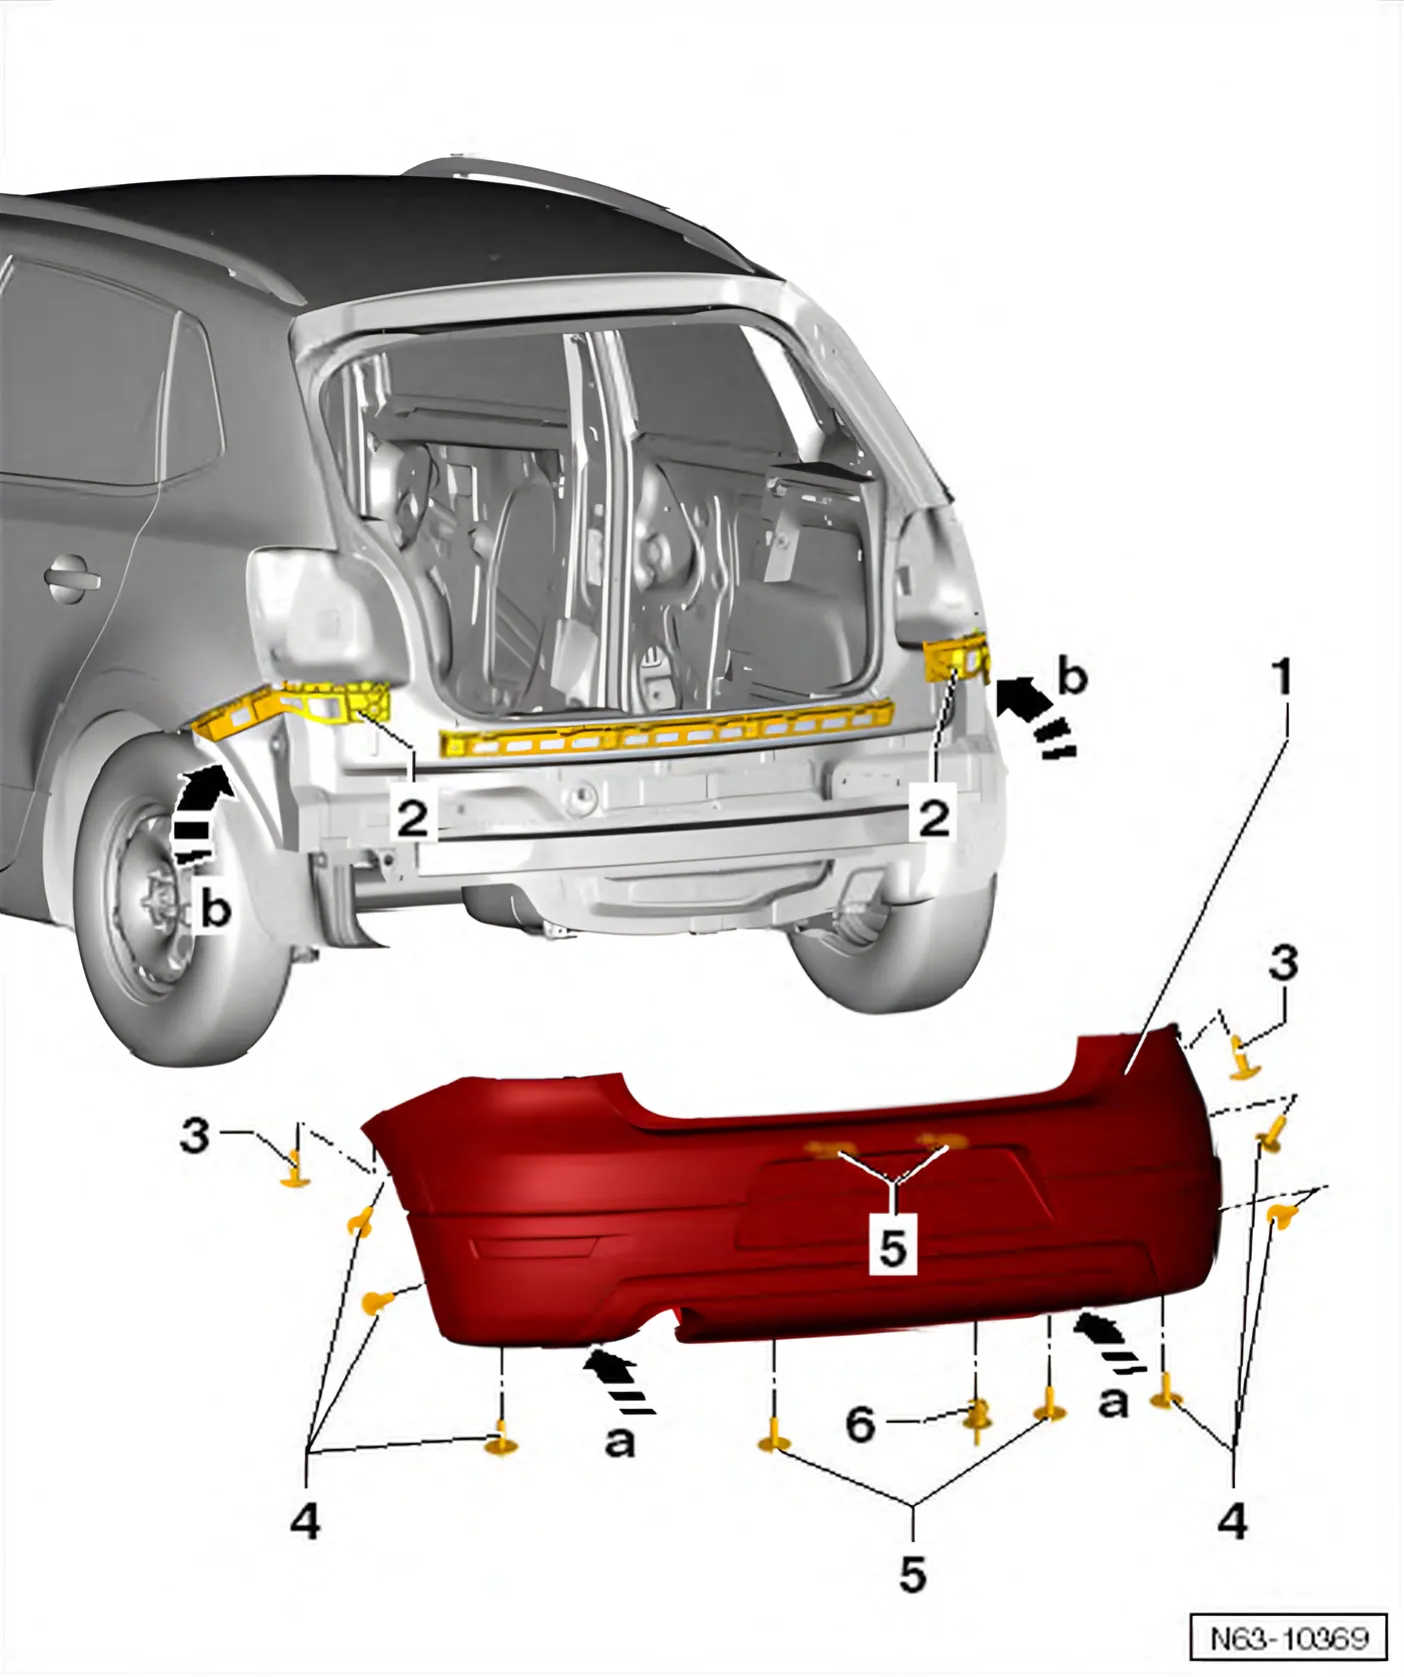
2.4.3 Removing and installing bumper cover, CrossPolo
Special tools and workshop equipment required
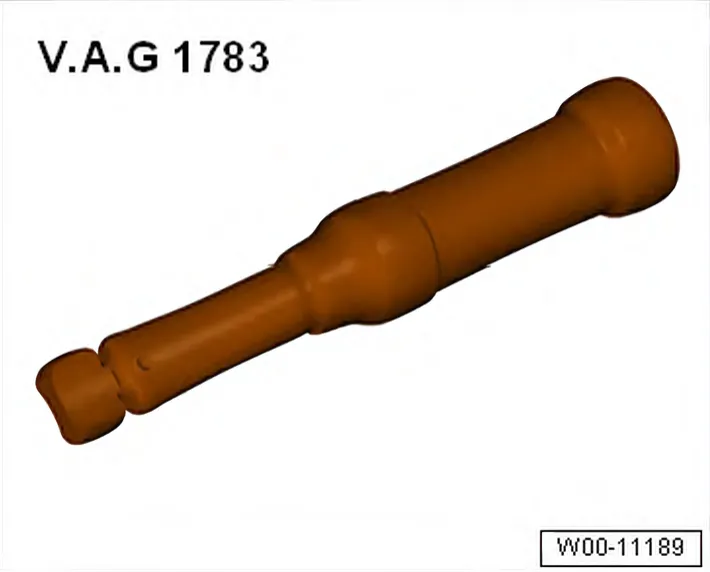
- Torque wrench - V.A.G 1783-
Removing
- Remove tail lights ⇒ Electrical system; Rep. gr. 94; Tail lights; Removing and installing tail light.
For instructions and work specifications for the parking aid system, refer to ⇒ Electrical system; Rep. gr. 94; Parking aid.
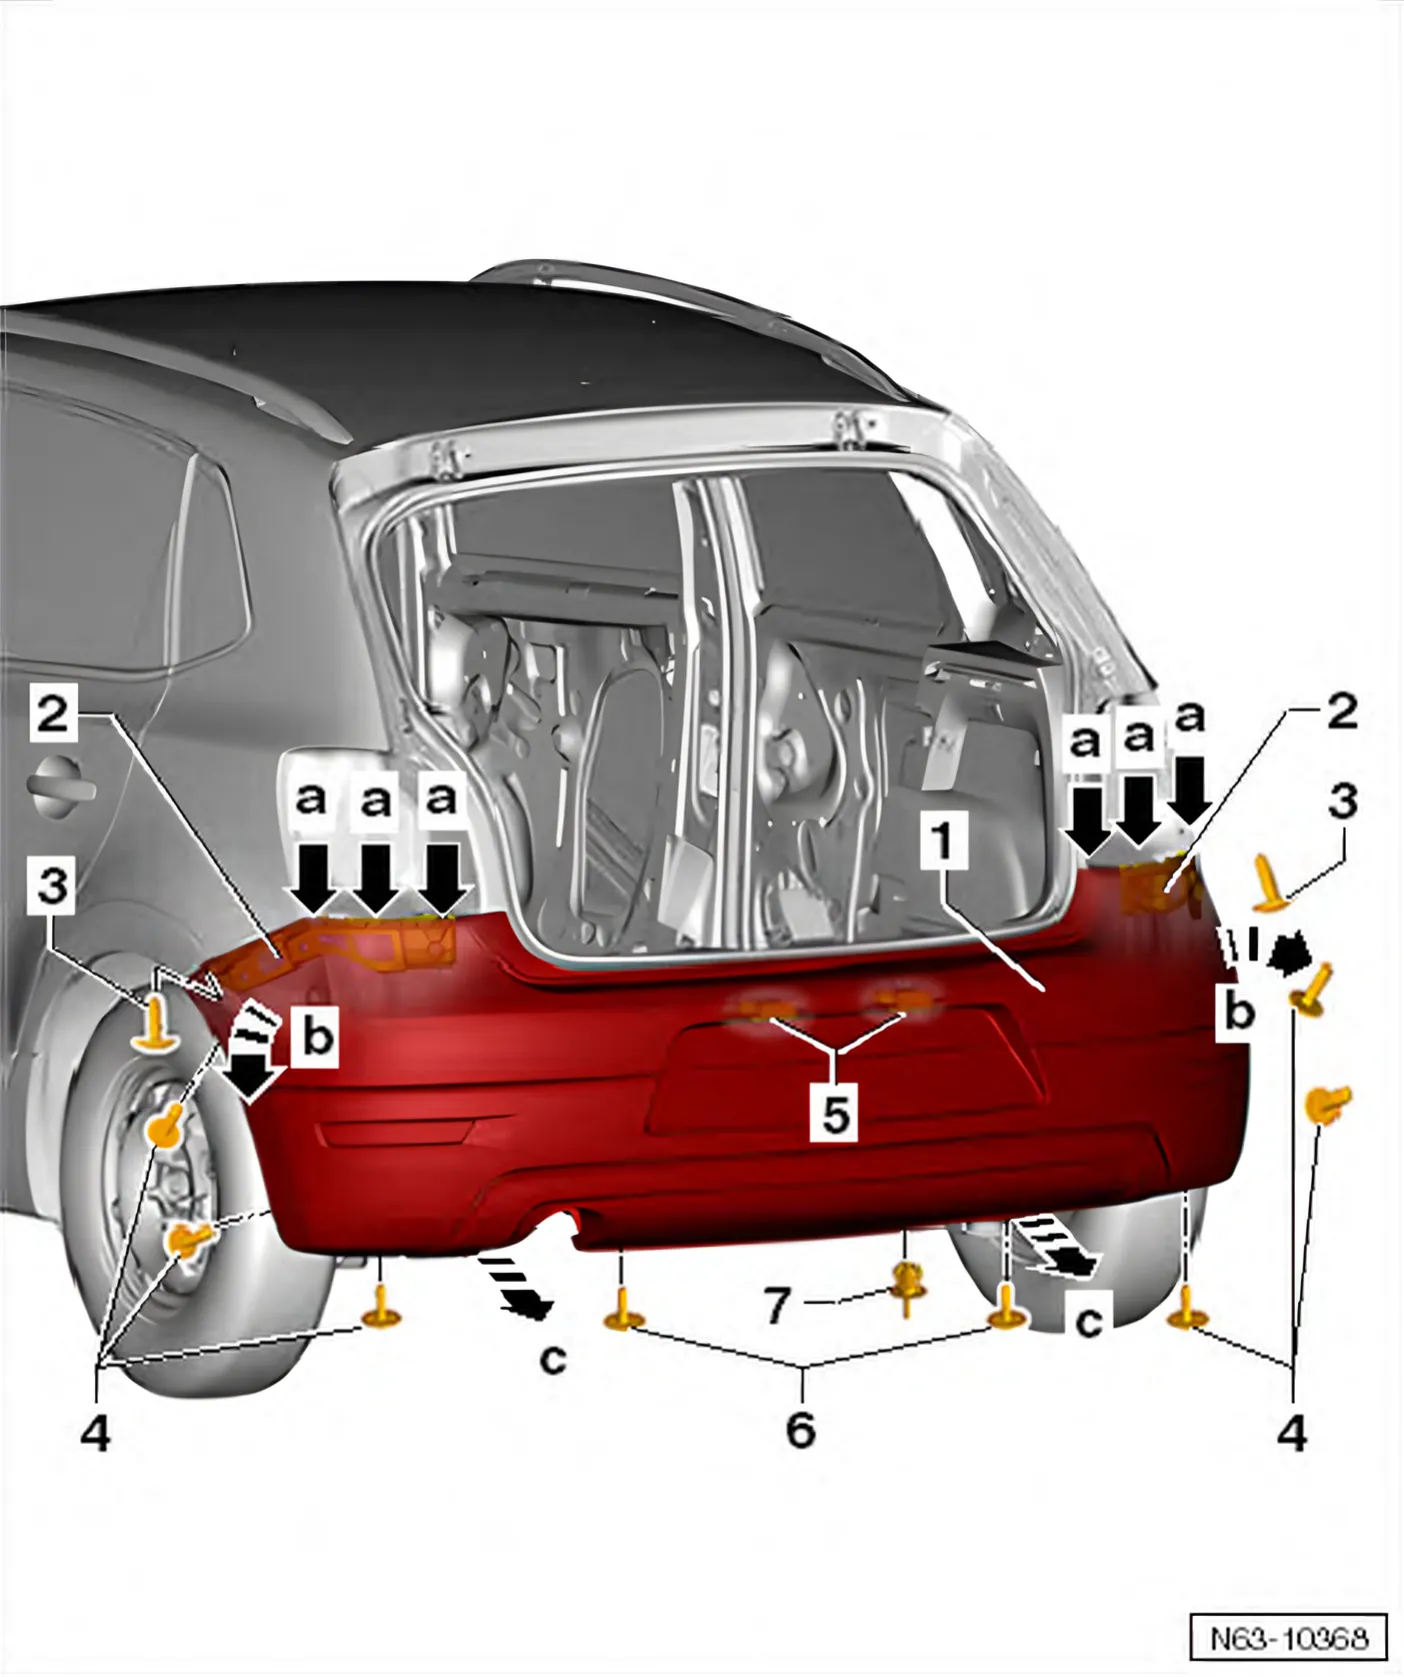
- Remove bolts -4- on left and right sides in area of wheel housing liner.
- Unscrew bolts -3- (pointing upwards) on left and right.
- Unscrew bolts -6- and detach clip -7-.
- Pull rear bumper cover -1- out of fasteners in lateral guides -arrows b-.
Further removal requires the help of a second mechanic.
- Release fasteners -arrows a- at lateral guides -2-.
- Pull rear bumper cover -1- parallel off vehicle -arrows c-.
- Remove connectors of all installed electrical components.
For instructions and work specifications for the parking aid, refer to ⇒ Electrical system; Rep. gr. 94; Parking aid.
Installing
- Fit rear bumper cover -1- with the aid of a second mechanic -arrows a-.
- Secure all existing connectors in place.
For instructions and work specifications for the parking aid, refer to ⇒ Electrical system; Rep. gr. 94; Parking aid.
- Push rear bumper cover -1- onto centre guide profile and onto left and right guide profile -arrows b- until they engage audibly with each other.
- Ensure that gaps and shut lines are parallel and specified dimensions are maintained ⇒ Body Repairs; Rep. gr. 00; Body panel gaps/shut lines; Body - rear.
- Fit bolts -3, 4 and 5- in place and tighten them to the respective specified torques ⇒ 2.1.3 Assembly overview – bumper cover, CrossPolo.
- Fasten clip -6-.
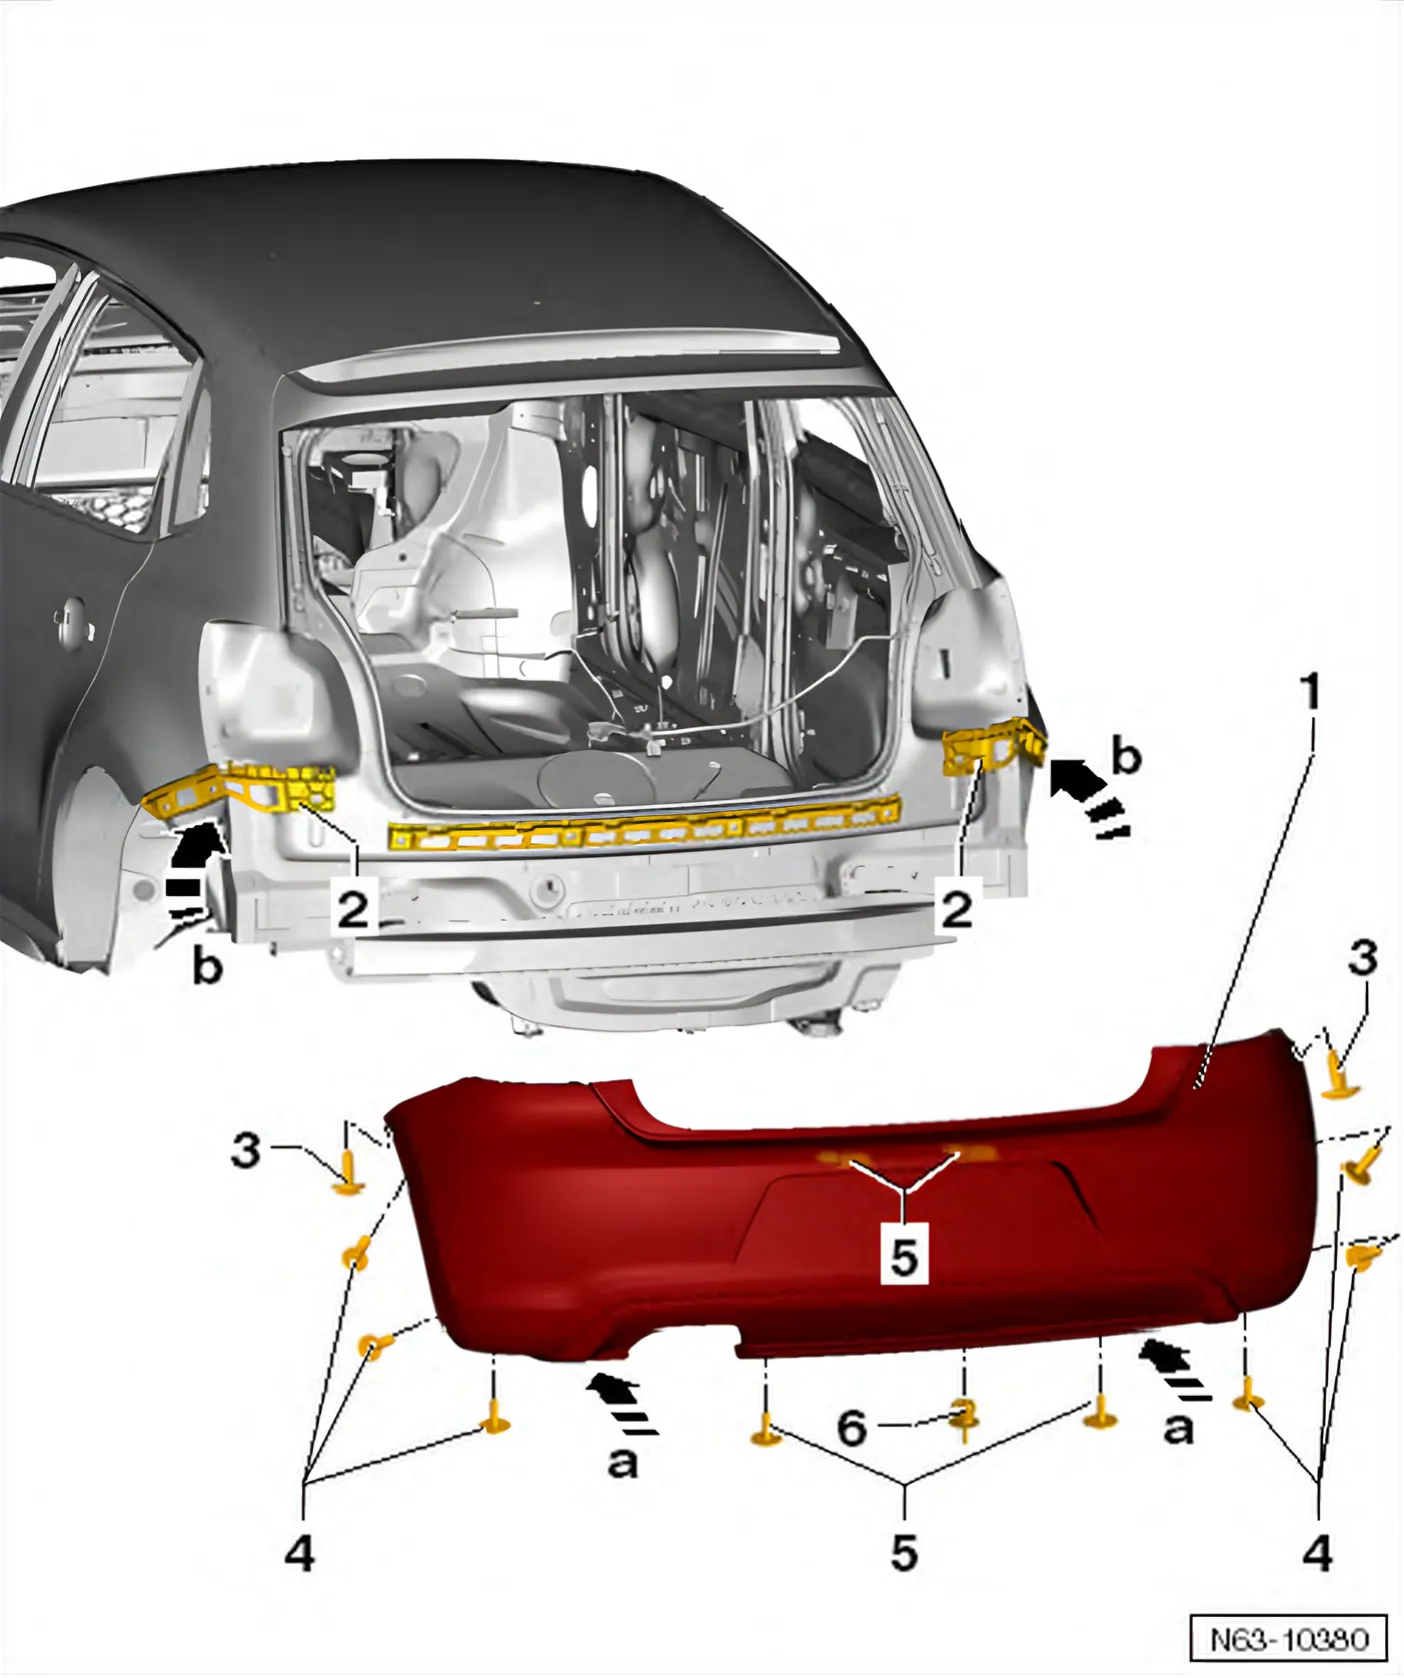
2.4.4 Removing and installing bumper cover, Polo GTI, Polo BlueGT
Special tools and workshop equipment required
- Torque wrench - V.A.G 1783-

Removing
- Remove tail lights ⇒ Electrical system; Rep. gr. 94; Tail lights; Removing and installing tail light.
For instructions and work specifications for the parking aid, refer to ⇒ Electrical system; Rep. gr. 94; Parking aid.
- Remove bolts -4- on left and right sides in area of wheel housing liner.
- Unscrew bolts -3- (pointing upwards) on left and right.
- Unscrew bolts -6- and detach clip -7-.
- Pull rear bumper cover -1- out of fasteners in lateral guides -arrows b-.
Further removal requires the help of a second mechanic.
- Release fasteners -arrows a- at lateral guides -2-.
- Pull rear bumper cover -1- parallel off vehicle -arrows c-.
- Remove connectors of all installed electrical components.
For instructions and work specifications for the parking aid, refer to ⇒ Electrical system; Rep. gr. 94; Parking aid.
Installing
- Fit rear bumper cover -1- with the aid of a second mechanic -arrows a-.
- Secure all existing connectors in place.
For instructions and work specifications for the parking aid, refer to ⇒ Electrical system; Rep. gr. 94; Parking aid.
- Push rear bumper cover -1- onto centre guide profile and onto left and right guide profile -2- -arrows b-, until they engage audibly with one another.
- Ensure that gaps and shut lines are parallel and specified dimensions are maintained ⇒ Body Repairs; Rep. gr. 00; Body panel gaps/shut lines; Body - rear.
- Fit bolts -3-, -4- and -5- in place and tighten them to the respective specified torque ⇒ 2.1.4 Assembly overview – bumper cover, Polo GTI, Polo BlueGT.
- Fasten clip -6-.
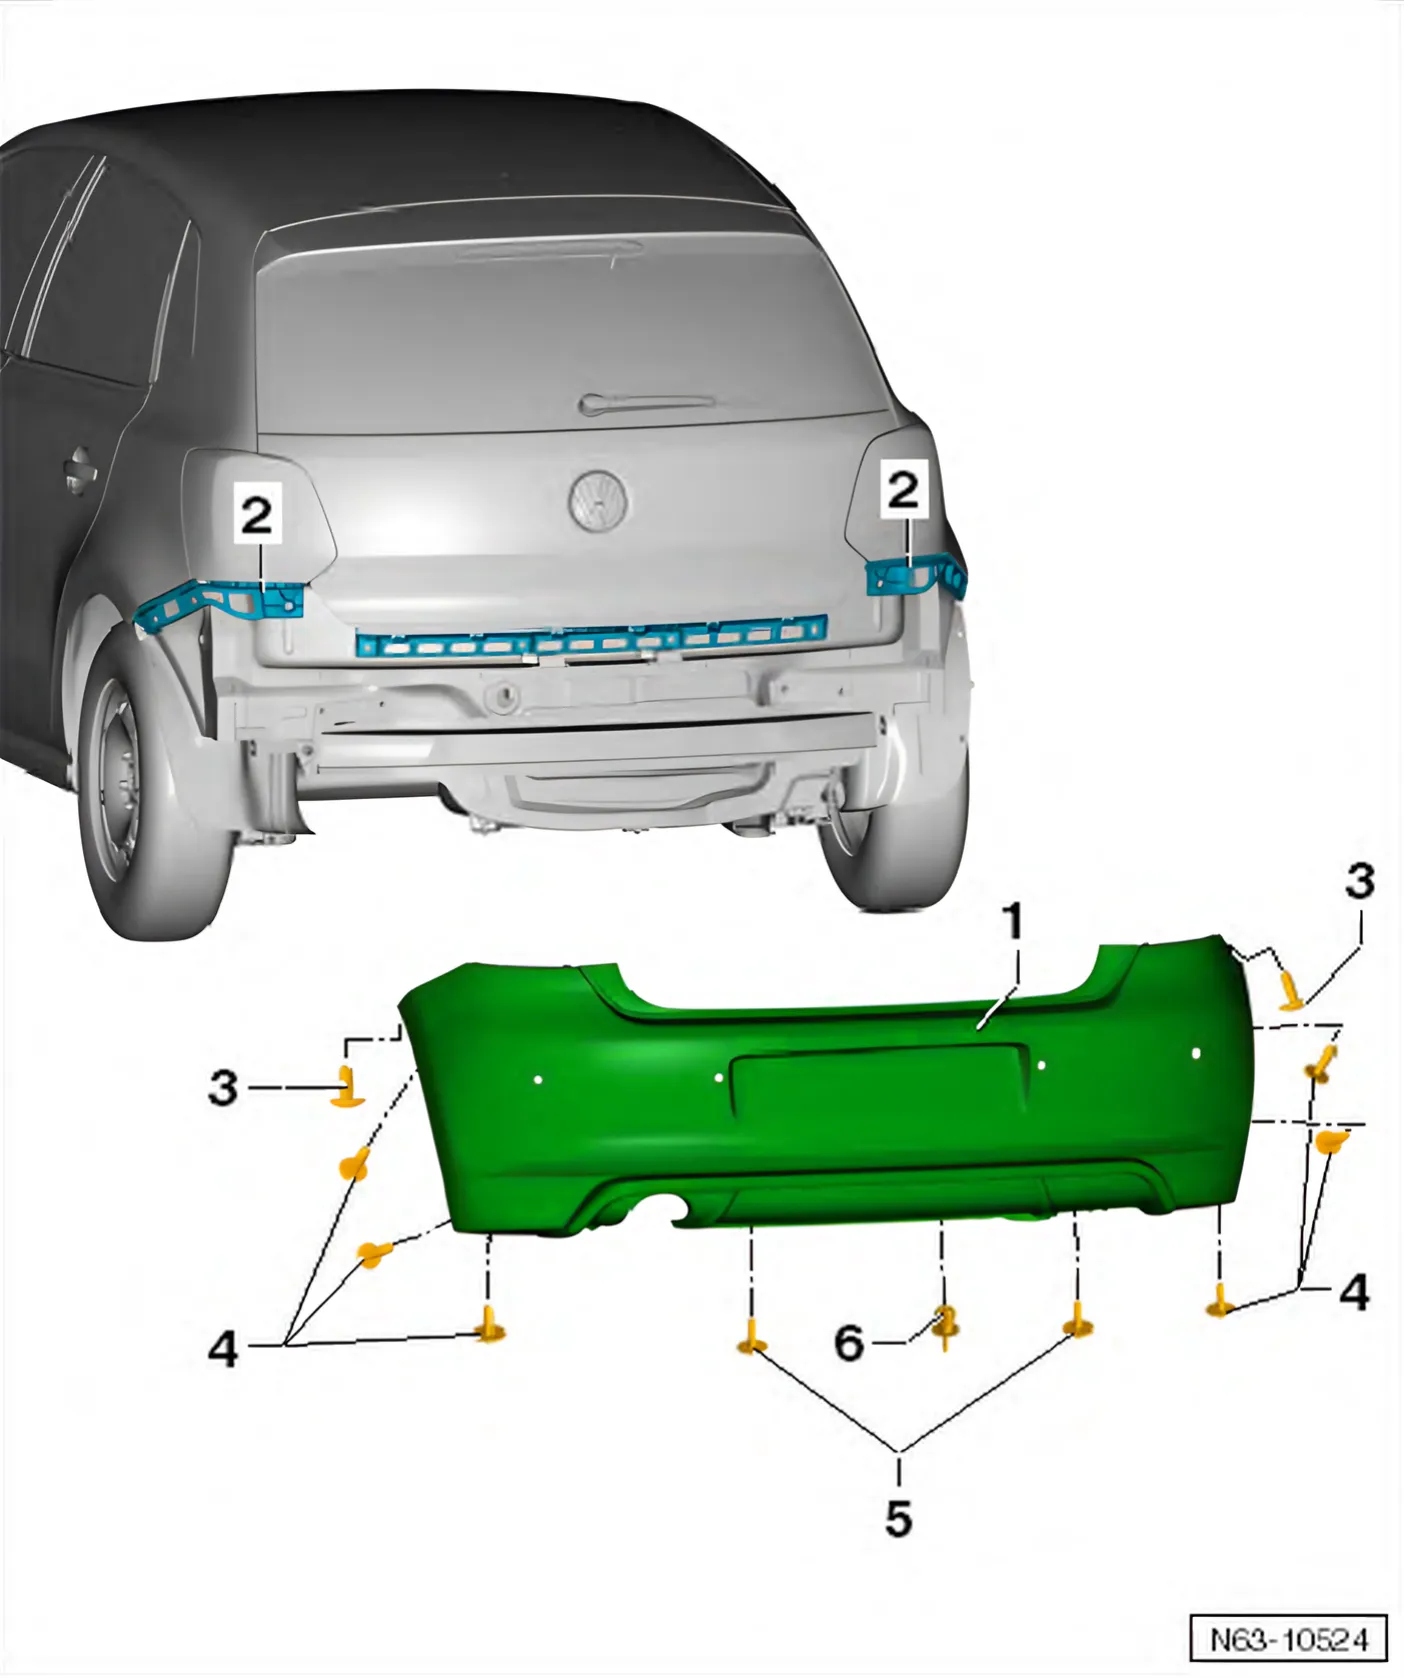
2.4.5 Removing and installing bumper cover, Polo »R-Line«
Special tools and workshop equipment required
- Torque wrench - V.A.G 1783-
Removing
- Remove tail lights ⇒ Electrical system; Rep. gr. 94; Tail lights; Removing and installing tail light.
For instructions and work specifications for the parking aid, refer to ⇒ Electrical system; Rep. gr. 94; Parking aid.
- Remove bolts -4- on left and right sides in area of wheel housing liner.
- Unscrew bolts -3- (pointing upwards) on left and right.
- Unscrew bolts -5-.
- Detach clip -6-.
- Pull rear bumper cover -1- out of fasteners in lateral guides.
Further removal requires the help of a second mechanic.
- Release catches on lateral guides -2-.
- Pull rear bumper cover -1- parallel off vehicle.
- Remove connectors of all installed electrical components.
For instructions and work specifications for the parking aid, refer to ⇒ Electrical system; Rep. gr. 94; Parking aid.

Installing
Install in the reverse order of removal, observing the following:
For instructions and work specifications for the parking aid, refer to ⇒ Electrical system; Rep. gr. 94; Parking aid.
- Ensure that gaps and shut lines are parallel and specified dimensions are maintained ⇒ Body Repairs; Rep. gr. 00; Body panel gaps/shut lines; Body - rear.
Specified torques