
1.4 MPI engine (EA111) · Removing and installing engine · Removing and installing engine
Removing engine
- The engine is removed forwards together with the gearbox.
- With ignition switched off, disconnect battery earth strap.
- All cable ties which are opened or cut through when engine is removed must be replaced in the same position when engine is installed.
- Remove air filter housing ⇒ 1.8 Removing and installing air filter housing.
- Remove battery and battery retainer.
- Open and close expansion tank cap to release pressure in cooling system.
- Pull off or disconnect all electrical connections on gearbox, alternator and starter and lay to side.
- Pull off or disconnect all other electrical connections as necessary from engine and lay to side.
- Pull fuel supply line off fuel rail.
- Pull hose from activated charcoal filter solenoid valve 1 - N80- on the throttle valve module.
- Seal lines so that fuel system is not contaminated by dirt.
- Observe rules for cleanliness ⇒ 1.3 Rules for cleanliness.
- Pull vacuum and breather hoses off engine.
- Pull connectors off thermal switch and radiator fan.
- Remove engine splash protection.
- Disconnect front exhaust pipe from exhaust manifold ⇒ 1.2 Assembly overview - front exhaust system with attachments.
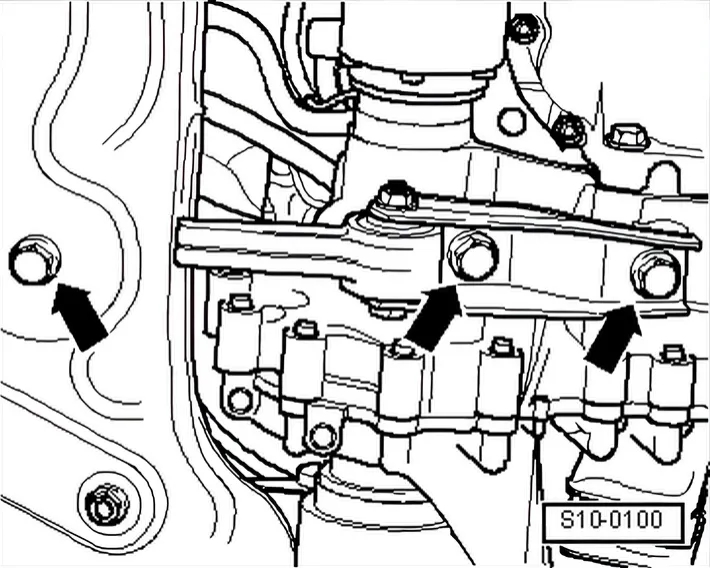
- Disconnect pendulum support -arrows-.
Vehicles with manual gearbox
- Disconnect selector mechanism from gearbox ⇒ 5-speed manual gearbox 02T; Rep. gr. 34; Repairing selector mechanism.
- Remove hydraulic clutch slave cylinder ⇒ 5-speed manual gearbox 02T; Rep. gr. 30; Repairing clutch mechanism.
Vehicles with automatic gearbox
- Disconnect selector lever cable from gearbox: ⇒ Automatic gearbox 001; Rep. gr. 37; Repairing selector mechanism; Dismantling and assembling selector mechanism.
- Drain coolant ⇒ 1.6 Draining and adding coolant.
- Pull coolant hoses off engine with hose clip pliers - VAS 6340-.
Vehicles with air conditioning system
- Remove poly V-belt ⇒ 1.4 Removing and installing poly-V belt.
- Remove air conditioner compressor ⇒ Heating, air conditioning system; Rep. gr. 87.
- Secure air conditioner compressor to lock carrier.
- Ensure that lines are not kinked.
- Observe additional information and installation work ⇒ 1.6 Additional information and assembly work for vehicles with air conditioner.
- Disconnect left and right drive shafts at gearbox and tie up ⇒ Running gear, axles, steering; Rep. gr. 40; Repairing drive shafts; Removing and installing drive shafts.
- Remove lock carrier with attachments ⇒ General body repairs exterior; Rep. gr. 50; Body - front; Removing and installing lock carrier with attachments.
- Move lock carrier clear to one side.
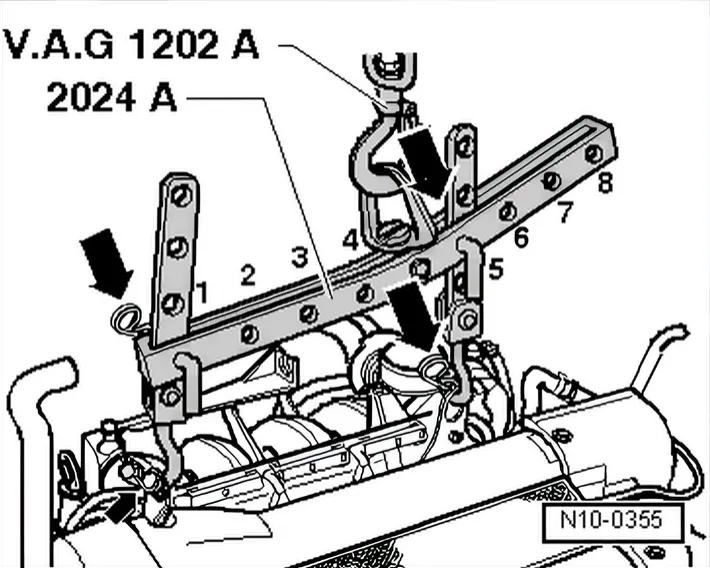
- Attach lifting tackle 2024 A as follows and lift slightly with workshop hoist:
Pulley end: 1st hole in hook rail at position 1
Flywheel end: 2nd hole in hook rail at position 5
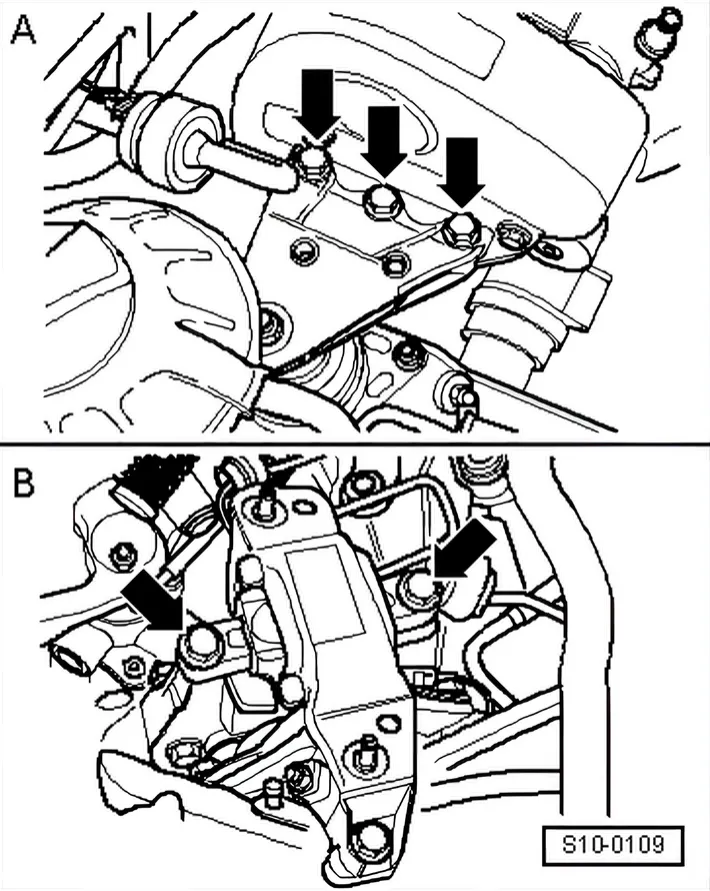
- Unbolt assembly at gearbox mounting -B- and engine mounting -A- -arrows-.
- Lower engine/gearbox assembly until it is free of the gearbox mounting.
- Pull engine/gearbox assembly out forwards. When doing this, turn the engine/gearbox assembly as necessary and lower it slightly.