
1.4 TSI engine (EA111) · Lubrication · Sump, oil pump
Sump, oil pump – assembly overview and fastening
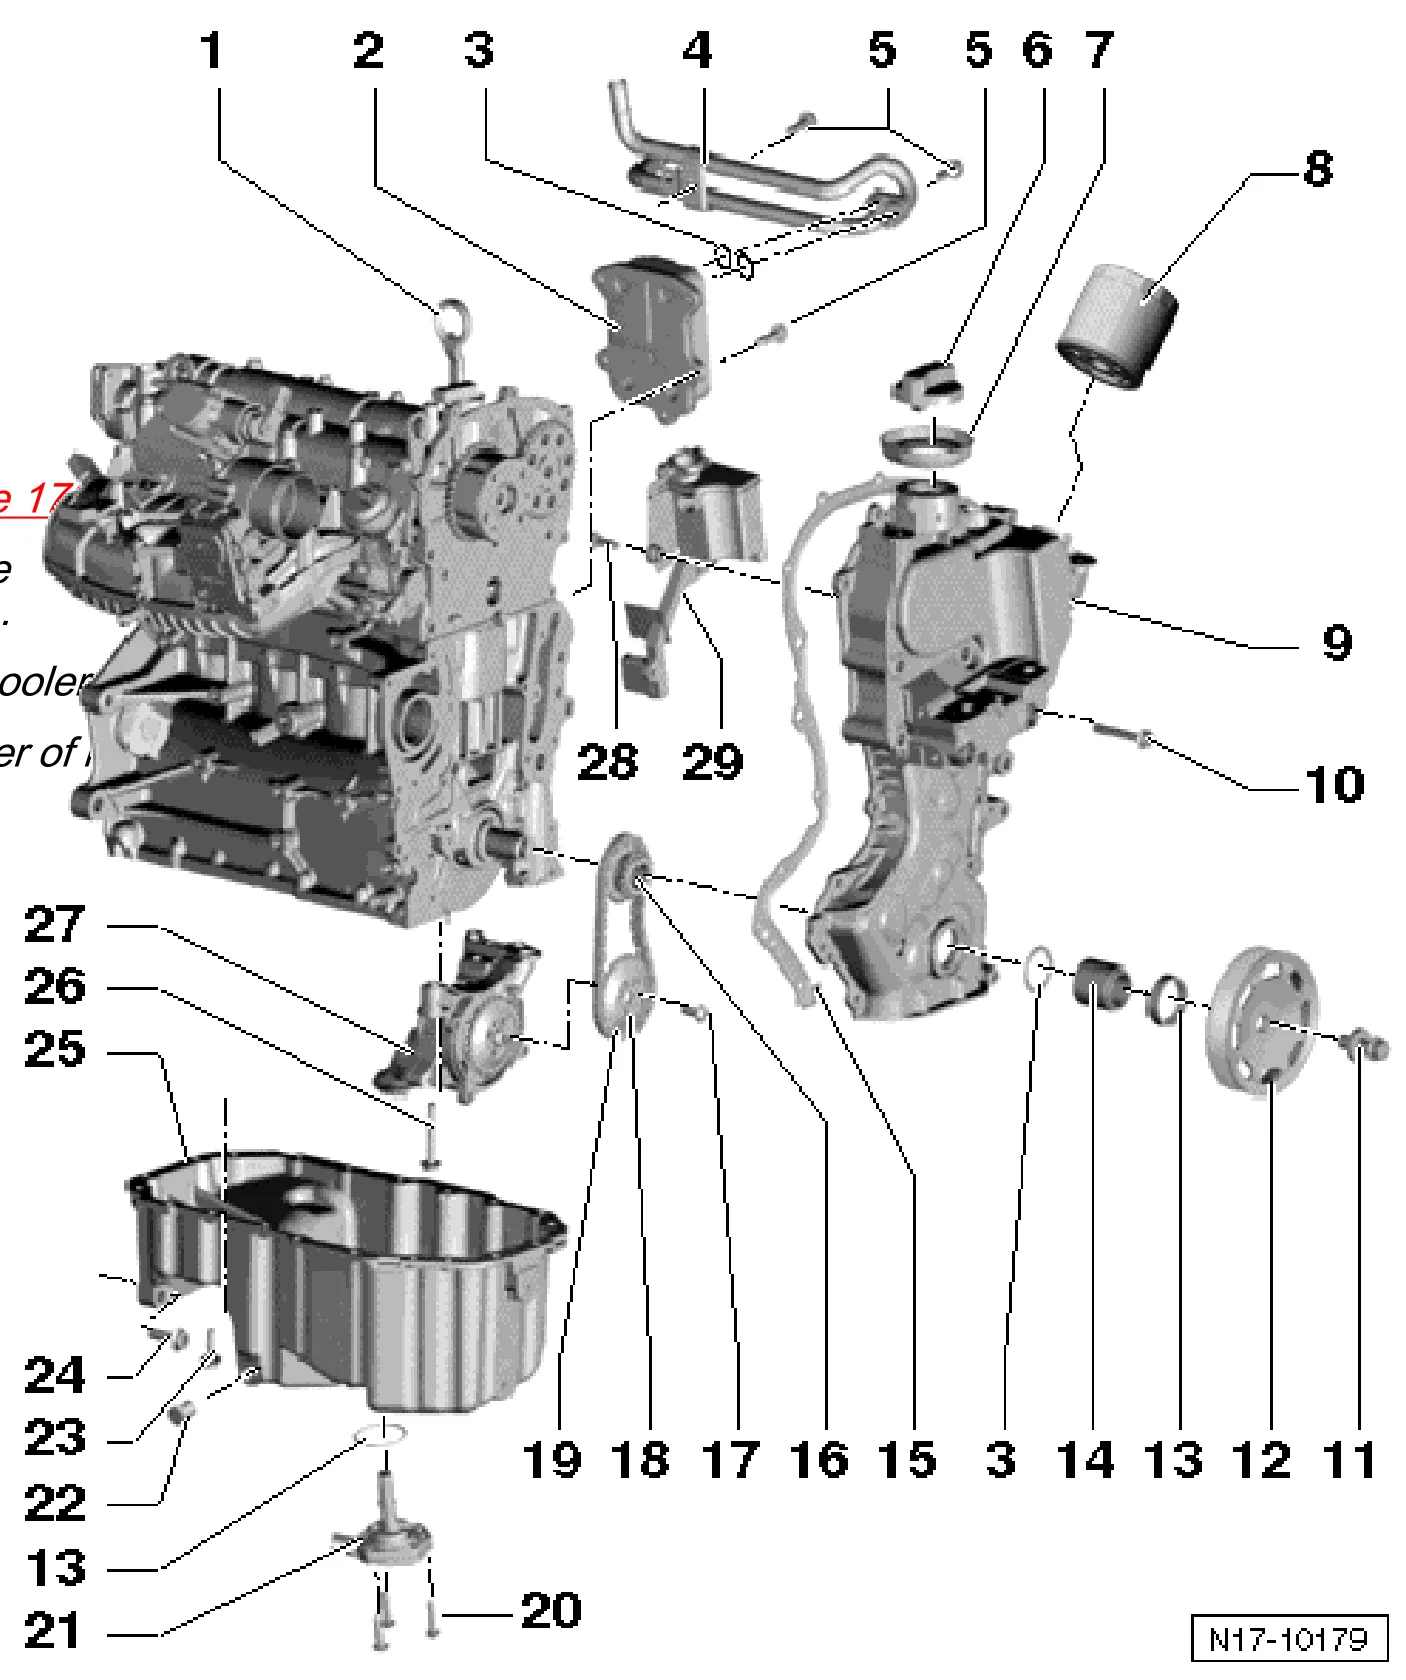
- 1 Oil dipstick
- The oil level must not be above the max. mark!
- Markings ⇒ 1.2 Assembly overview - sump, oil pump.
- 2 Engine oil cooler
- 3 O-ring
- Renew
- 4 Coolant pipe
- For engine oil cooler
- Specified torque, bracket to crankcase: 20 Nm.
- 5 8 Nm
- 6 Cap
- Renew seal if damaged.
- 7 Seal
- Renew if damaged
- 8 Oil filter, 20 Nm
- Loosen with oil filter tool - 3417-.
- Observe fitting instructions on oil filter
- With non-return valve
- 9 Valve timing housing
- Additionally install with silicone adhesive sealant - D 176 501 A1-.
Removing and installing valve timing housing (Eos, Golf Plus, Golf, Scirocco, Polo, Sharan, Golf Cabriolet) ⇒ 3.1 Removing and installing valve timing housing (Eos, Golf Plus, Scirocco, Golf, Polo, Sharan, Golf Cabriolet)
Removing and installing valve timing housing (Tiguan, Touran)
Remove valve timing housing (Passat, Passat CC)
- When installing, install two -M6x80- studs in cylinder block and camshaft housing as a guide.
- To guide valve timing housing, secure sump in position with two bolts.
- 10 10 Nm
- 11 Securing bolt
- Removing and installing crankshaft pulley ⇒ 1.7 Removing and installing crankshaft pulley
- Renew
- Contact surface for securing bolt must be free of oil and grease.
- Oil threads before inserting.
- Secure belt pulley against turning with counterhold - 3415-.
- The turning further angle can be measured with a commercial protractor.
- 12 Belt pulley
- With diamond coated washer
- Observe note on diamond coated washers ⇒ 1.6 Renewing crankshaft oil seal - pulley end.
- Contact surfaces of pulley must be free of oil and grease.
- Removing and installing poly V-belt (Golf Plus, Eos, Scirocco, Golf, Touran, Polo, Sharan, Passat, Passat CC, Golf Cabriolet) ⇒ 1.3 Removing and installing poly V-belt (Golf Plus, Eos, Scirocco, Golf, Touran, Polo, Sharan, Passat, Passat CC, Golf Cabriolet)
- Removing and installing poly V-belt (Tiguan)
- Secure belt pulley against turning with counterhold - 3415-.
- 13 Seal
- Renew
- 14 Bearing bush
- Contact surfaces of bearing bush must be free of oil and grease.
- 15 Seal
- Renew if damaged
- 16 Sprocket
- Removing and installing ⇒ 4.4 Removing and installing timing chain and chain drive for oil pump
- For oil pump drive.
- 17 20 Nm + 1/4 turn (90°) further
- Renew
- 18 Sprocket
- Removing and installing ⇒ 4.4 Removing and installing timing chain and chain drive for oil pump
- For oil pump.
- Lock with counterhold - T10172-.
- 19 Drive chain
- Removing and installing ⇒ 4.4 Removing and installing timing chain and chain drive for oil pump
- For oil pump.
- Before removing, mark direction of rotation (installation position).
- 20 10 Nm
- 21 Oil level and oil temperature sender - G266-
- Renew if damaged
- Checking: ⇒ Current flow diagrams, Electrical fault finding and Fitting locations
- 22 Oil drain plug, 30 Nm
- With captive seal
- Renew
- 23 13 Nm
- Loosen and tighten flywheel end bolts only with long-reach Allen key - T10058-.
- 24 40 Nm
- 25 Oil pan
- Removing and installing ⇒ 1.3 Removing and installing sump
- Clean sealing surface before fitting.
- Install with silicone sealant - D 176 600 A1-.
- 26 14 Nm + 1/4 turn (90°) further
- 27 Oil pump
- 28 2 Nm + 1/4 turn (90°) further
- 29 Oil separator
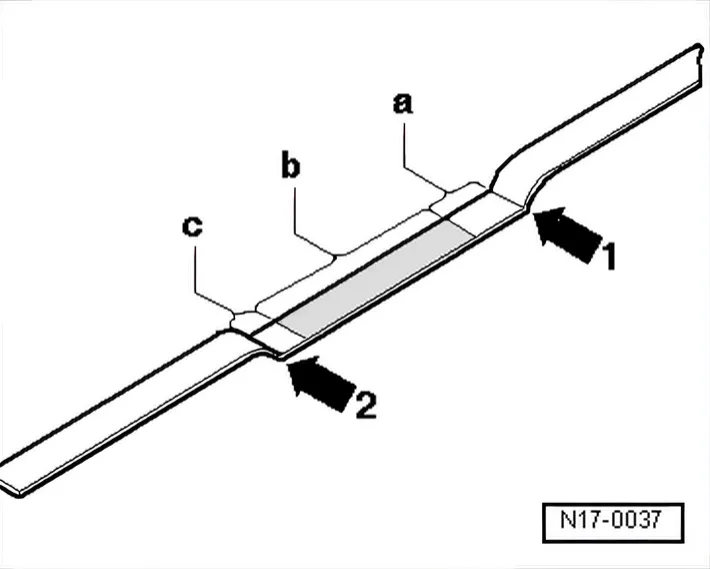
Markings on oil dipstick
- 1 Max. mark
- 2 Min. mark
a - Area above hatched field up to max. mark: Do not top up with engine oil!
b - Oil level within hatched zone: engine oil can be added
c - Area from min. mark up to hatched field: top up with max. 0.5 l of engine oil!